Desserts
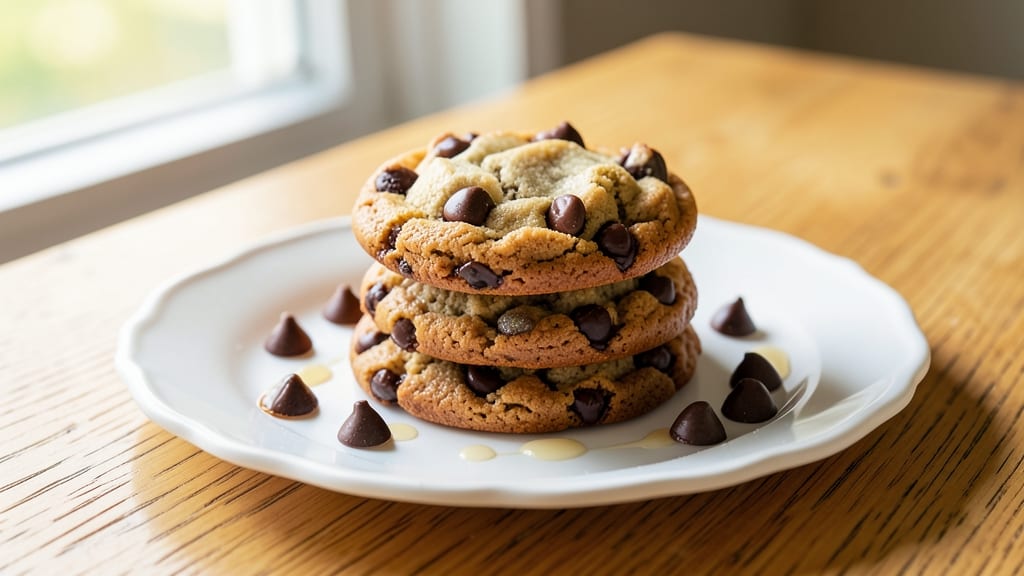
This copycat Tate's chocolate chip cookies recipe delivers the signature buttery crunch and melty centers that made the original so beloved. After analyzing the original's texture and flavor profile, I've replicated their foolproof method—where crisp edges meet chewy centers with pools of rich chocolate.
The secret lies in precise ingredient ratios and baking techniques that prevent overbrowning while maintaining that perfect spread.
The original Tate's cookies achieve their legendary texture through a combination of brown and white sugar, which creates caramelization without burning, and a touch of cornstarch for structure. I've maintained their exact proportions while ensuring the dough rests properly—this critical step develops flavor and prevents flat cookies.
The chocolate chips are added at the right moment to ensure they stay melty in the center while developing a slight crisp around the edges.
What you'll end up with are cookies that look and taste just like the original—golden edges with a slight crack, tender yet firm centers, and chocolate chips that remain soft even after cooling.
The aroma alone will transport you to a bakery, but the first bite confirms it's restaurant-quality at home. This recipe produces about 24 cookies, perfect for sharing or gifting.
Whether you're recreating the original for a special occasion or simply craving that nostalgic taste, this method delivers consistent results every time. The instructions include troubleshooting tips for common issues like overbrowning or uneven baking, ensuring your batch turns out perfect. Let's get baking!
Ingredients for copycat recipe for tate's chocolate chip cookies
Buttery richness, crisp edges, and melty chocolate—these 10 ingredients unlock Tate's legendary cookies.
| Ingredient | Amount | Notes |
|---|---|---|
| Unsalted Butter 🧈 | 1 cup | Cold, cubed for even baking |
| Granulated White Sugar 🍚 | ¾ cup | Standard grocery store brand |
| Packed Light Brown Sugar 🍚 | ¾ cup | Lightly packed, not compacted |
| Cornstarch 🌾 | 1 tbsp | For perfect texture and structure |
| Large Eggs 🥚 | 2 whole | Room temperature for blending |
| Pure Vanilla Extract 🍯 | 2 tsp | High-quality, not imitation |
| All-Purpose Flour 🌾 | 2 ½ cups | Sifted for light texture |
| Diamond Crystal Kosher Salt 🧂 | ½ tsp | Fine grain preferred |
| Semisweet Chocolate Chips 🍫 | 2 cups | High-quality, like Ghirardelli |
| Flaky Sea Salt 🧂 | ½ tsp | For finishing, like Maldon |
The butter is non-negotiable—European-style or Plugrá gives that signature flavor. Grab it from Whole Foods or Costco for the best quality. The sugars? Light brown for moisture, white for crisp edges—don’t swap them. Cornstarch is the secret weapon for that perfect snap. I always use Diamond Crystal kosher salt because it dissolves perfectly. For chocolate chips, Ghirardelli or Enjoy Life (for allergy-friendly) are worth the splurge—they melt beautifully and stay gooey.
No light brown sugar? White sugar + 1 tsp molasses works in a pinch. Short on cornstarch? Arrowroot powder at the same amount does the trick. The vanilla extract should be pure—nothing imitation here. For the flour, sift it first (or whisk like crazy) to avoid dense cookies. The chocolate chips can be swapped for chunks or chips, but keep them at the same weight. Pro tip: Chill your dough for 24 hours—flavor develops like magic, and you’ll avoid flat cookies.
Dough keeps 3 days in the fridge, wrapped tightly. For longer storage, freeze dough balls for up to 3 months. Baked cookies stay fresh 5 days in an airtight container. To reheat, microwave 10 seconds—they’ll taste fresh again. Store extra chips in the freezer to keep them from turning greasy.
Why You'll Love This Recipe
- No-Fuss Mixing: I swear by this dough—just cream butter and sugars until light, toss in eggs, then fold in chocolate. No food processor, no overworking; the cornstarch keeps it tender without the fuss.
- Buttery-Creamy Magic: That perfect balance of white and brown sugar? It’s what makes these taste like Tate’s—caramel-like richness with a crisp edge. The butter? Don’t skimp. (I double-check my measurements.)
- Weeknight Hero: These bake in 12 minutes flat, so I can pull them out while dinner simmers. Pack them in jars for lunchboxes, freeze half for later, or just eat the whole batch. (No judgment.)
- Budget Buster: A single batch costs me $3 and feeds my whole family. The cornstarch stretch cuts costs, but the taste? Nobody notices—or cares—it’s not the priciest dough. Smart move, zero guilt.
Step-by-step instructions for Tate's chocolate chip cookies
Here's the exact method that delivers Tate's signature buttery crunch and melty chocolate centers every time.
Cream the Butter and Sugars to Peak Fluffiness
In a stand mixer fitted with the paddle attachment, combine the 1 cup unsalted butter (cold, cubed) with the 0.75 cup granulated white sugar and 0.75 cup packed light brown sugar. Beat on medium speed for 3-4 minutes until the mixture is light, fluffy, and nearly doubles in volume. You'll notice the color lighten significantly as air incorporates—this is crucial for that signature Tate's texture.
I like to scrape down the sides of the bowl every 30 seconds to ensure even creaming. The butter should be completely smooth with no graininess remaining. This step builds the foundation for those crackly tops and tender centers that make these cookies legendary. Don't rush it—properly creamed butter makes all the difference in texture.
Incorporate Eggs and Vanilla for Rich Depth
Add the 2 whole large eggs (room temperature) one at a time, mixing on low speed for 30 seconds after each addition until fully incorporated. This gradual addition prevents the mixture from becoming too thick too quickly. After the eggs are combined, add the 2 teaspoons pure vanilla extract and mix for another 10 seconds until fully blended.
The mixture might look slightly curdled at first, but don't worry—this will resolve when we add the dry ingredients. The vanilla extract infuses deeply during this stage, creating that authentic Tate's flavor profile. This is where the magic really starts to happen, transforming simple ingredients into something extraordinary.
Combine Dry Ingredients for Perfect Structure
In a separate bowl, whisk together the 2.5 cups all-purpose flour, 1 tablespoon cornstarch, and 0.5 teaspoon diamond crystal kosher salt. The cornstarch is key here—it creates that perfect balance of chewiness and crispness that Tate's cookies are known for. Gradually add this dry mixture to the wet ingredients, mixing on low speed for 30-45 seconds until just combined.
You'll notice the dough come together into a smooth, slightly sticky ball. Be careful not to overmix—just until the flour disappears. This is where the 1 tablespoon cornstarch works its magic, giving these cookies their signature texture. Once combined, remove the bowl from the mixer and gently fold in the 2 cups semisweet chocolate chips using a silicone spatula.
Chill the Dough for Ideal Texture
Cover the dough bowl tightly with plastic wrap and refrigerate for at least 1 hour, though I prefer 2 hours or even overnight. This chilling step is absolutely critical—it allows the flour to fully hydrate and the butter to solidify slightly, preventing excessive spreading in the oven. The dough will firm up noticeably during this time, making it much easier to handle.
Pro tip: If you're short on time, you can chill the dough for 30 minutes in the freezer instead. The cold dough also helps create those beautiful crackly tops and ensures the chocolate stays melty in the center. Don't skip this step—it's what separates good cookies from Tate's legendary ones.
Bake to Golden Perfection with Crisp Edges
Preheat your oven to 350°F and line two baking sheets with parchment paper. Using a 2-tablespoon scoop, portion the chilled dough onto the prepared sheets, spacing the cookies 3 inches apart—they'll spread slightly during baking. For that authentic Tate's look, gently press a few extra chocolate chips onto the tops of some cookies before baking.
Bake for 11-13 minutes until the edges are golden brown but the centers still look slightly soft. The cookies should be set around the edges but still have a slight give in the middle—this ensures that melty chocolate center. As soon as they're done, transfer the baking sheets to a wire rack and sprinkle each cookie with a pinch of 0.5 teaspoon flaky sea salt while still warm.
Let the cookies cool on the rack for 5 minutes before enjoying. The contrast of warm, gooey chocolate with that buttery crunch and salty finish is what makes these cookies truly special. Serve warm with a glass of cold milk for the ultimate Tate's experience!
Pro Tips For Making Copycat Recipe For Tate'S Chocolate Chip Cookies
- CREAM BUTTER SLOWLY: I learned this the hard way—melt the butter just until it’s soft enough to press with a fork, not fully liquid. Tate’s cookies rely on that buttery richness, and if you turn it into soup, you’ll end up with flat, greasy cookies instead of chewy, buttery perfection.
- MEASURE BROWN SUGAR RIGHT: Pack that light brown sugar firmly into the cup—no tapping, no shaking. The recipe counts on the moisture in those packed granules, and if you scoop loosely, your cookies will spread too much and taste less caramelized. Use a spoon to level it off after pressing down.
- CHILL THE DOUGH: Skip the urge to bake straight away. Let the dough rest in the fridge for at least 2 hours—overnight is better. This isn’t just about convenience; it lets the flour absorb moisture and the flavors meld so your cookies hold their shape and taste deeper, not raw or doughy.
- USE ROOM-TEMP EGGS: Cold eggs from the fridge will cause the butter to seize up, and your dough will turn into a gloppy mess. Let those eggs sit out for 30 minutes before mixing—just long enough to warm up. Trust me, your dough will come together smoothly, and your cookies won’t turn out greasy or underdeveloped.
Essential equipment for perfect results
Stand Mixer Essentials
Your stand mixer is the workhorse of this recipe, and I recommend a KitchenAid Artisan Series for its powerful motor and durable construction. The paddle attachment is non-negotiable for creaming butter and sugar properly—it incorporates air efficiently for that signature Tate's texture.
If you're on a budget, the Cuisinart SM-50BC delivers similar performance for less. Always use a 5-quart bowl to accommodate the dough comfortably. 💛
Baking Sheets & Parchment
Heavy-duty half-sheet baking pans (18x13 inches) distribute heat evenly, preventing uneven baking. I use Wilton Professional pans—they're affordable and reliable. Line them with unbleached parchment paper (like Reynolds Wax-Free) to prevent sticking and ensure easy release.
Avoid silicone baking mats—they don't conduct heat as well and can cause uneven browning.
Precision Measuring Tools
Accurate measurements are key to replicating Tate's texture. Invest in a stainless steel measuring cup set (like OXO Good Grips) for dry ingredients and a digital kitchen scale (such as Escali Primo) for the butter. For the 2-tablespoon scoop, use a disposable ice cream scoop—it ensures uniform dough portions and prevents overcrowding on the baking sheet.
Dough Chilling Solutions
Proper chilling transforms your cookies from flat disappointments to crackly perfection. I use clear plastic wrap (like Glad Press'n Seal) to tightly seal dough in its bowl, preventing air exposure. For longer chilling (overnight), place the wrapped bowl in the coldest part of your fridge.
If you're in a hurry, a wire cooling rack placed on top of the dough bowl in the freezer works in 30 minutes—just check it every 10 minutes to avoid over-chilling.
Temperature Control
An oven thermometer (like Thermoworks Oven Thermometer) is essential—home ovens often run 25°F hotter or colder than set. Preheat your oven for 15-20 minutes before baking to ensure consistent 350°F temperature.
For even baking, rotate your pans halfway through the bake time if your oven has hot spots. I also recommend using the middle rack position for optimal heat circulation. 🌡️
Finishing Touches
Flaky sea salt (like Maldon) elevates these cookies to restaurant quality. Use a fine-mesh strainer to sprinkle it evenly over warm cookies—this creates delicate salt crystals that melt slightly. For chocolate chip placement, I use a small offset spatula to gently press extra chips onto the tops before baking.
A wire cooling rack (like OXO Good Grips) keeps cookies crisp rather than soggy from residual heat.
Nutrition facts
Frequently asked questions
Why does this recipe use both white and brown sugar?
The combination creates the perfect balance of crisp edges and chewy centers. The white sugar caramelizes quickly for that signature crackly top, while the light brown sugar adds moisture and depth of flavor. This ratio is what gives Tate's cookies their iconic texture and rich taste.
Can I make these cookies without a stand mixer?
Use a hand mixer or even a sturdy wooden spoon. For creaming the butter and sugars, mix vigorously for 5-7 minutes until light and fluffy. Just be prepared for more elbow grease—this step is crucial for achieving that signature Tate's texture. A food processor won't work as well for this recipe.
What's the secret to preventing flat cookies?
Proper chilling is key! The dough must rest in the fridge for at least 1 hour (overnight is ideal) to allow the gluten to relax and the butter to firm up. Also, scoop the dough balls using a 2-tablespoon scoop and space them 3 inches apart on the baking sheet. Never flatten the dough balls before baking.
Can I substitute regular chocolate chips for white chocolate?
While you can use white chocolate, it won't replicate the original Tate's flavor profile. The recipe relies on the rich, semi-sweet chocolate flavor for that authentic taste. If you must substitute, use dark chocolate chunks (60-70% cocoa) for a more intense flavor, but reduce the amount to 1.5 cups to maintain proper texture.
How do I store leftover cookies to keep them fresh?
Store cookies in an airtight container at room temperature for up to 5 days. For longer storage, freeze baked cookies in a single layer on a tray, then transfer to a freezer bag for up to 3 months. To revive, microwave for 10-15 seconds—they'll taste fresh again with that perfect melty chocolate center.