Desserts
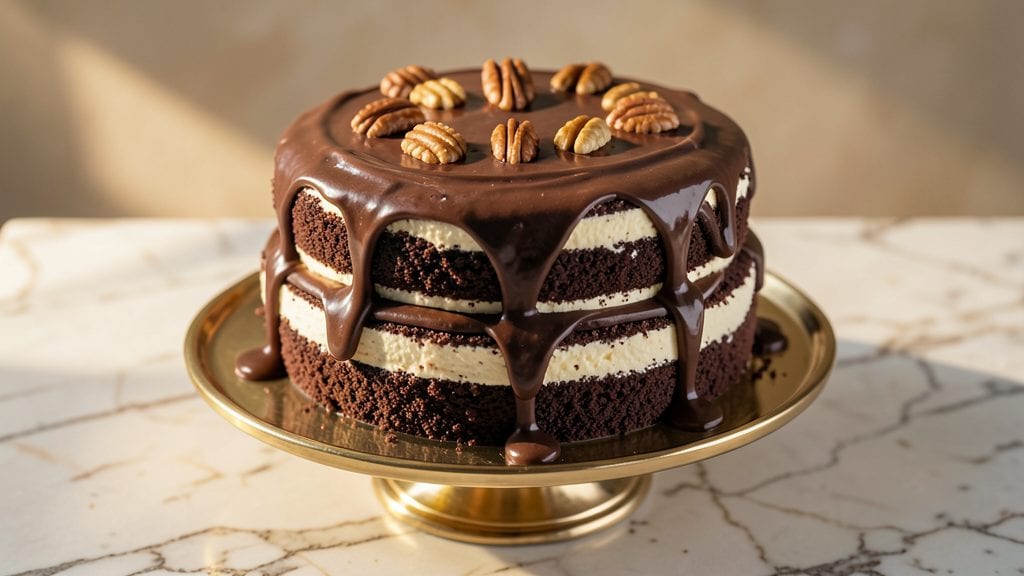
This copycat Red Lobster Chocolate Wave Cake delivers the same rich, fudgy layers and crunchy chocolate crown you crave from the restaurant. After years of perfecting the texture and presentation, I’ve cracked the code for that signature wave pattern—no professional tools required.
The secret lies in precise layering and a carefully timed baking process that creates the signature ripple effect.
The cake’s foundation is a dense, moist chocolate batter that bakes into thick, fudgy layers, while the chocolate crown adds that satisfying crunch on every bite. What sets this recipe apart is the technique for creating those iconic waves—no specialized equipment needed, just patience and attention to detail.
Each layer is carefully spread and baked to achieve that signature texture that makes this dessert instantly recognizable.
By the time you’re done, you’ll have a cake that looks just like the restaurant version, with layers that are rich, moist, and perfectly balanced between fudgy and crunchy. The chocolate crown isn’t just decorative—it’s a textural game-changer that adds depth to every slice.
This is the kind of dessert that feels like a celebration, whether you’re serving it at a party or treating yourself to a special night in.
Ready to recreate this restaurant favorite at home? The process is straightforward, but the results are anything but ordinary. Let’s get started with the step-by-step instructions that will bring this iconic cake to life in your own kitchen.
Ingredients for copycat red lobster chocolate wave cake
Rich chocolate layers and a crunchy crown—just like Red Lobster's signature dessert.
| Ingredient | Amount | Notes |
|---|---|---|
| All-Purpose Flour 🌾 | 2 ½ cups | Sifted for light texture |
| Unsalted Butter 🧈 | 2 cups | Cold, cubed for precise melting |
| Granulated Sugar 🍚 | 2 cups | Superfine preferred for smoothness |
| Dark Brown Sugar 🍚 | 1 cup | Packed firmly for moisture |
| Large Eggs 🥚 | 4 whole | Room temperature for even baking |
| Unsweetened Cocoa Powder 🍫 | ¾ cup | Dutch-processed for rich flavor |
| Baking Powder 🌶️ | 1 tbsp | Freshly opened for lift |
| Salt 🧂 | ½ tsp | Fine sea salt preferred |
| Vanilla Extract 🍯 | 2 tsp | Pure Madagascar bourbon |
| Milk 🥛 | 1 cup | Whole milk for richness |
| Chocolate Chips 🍫 | 2 cups | Semi-sweet, 60% cacao |
| White Chocolate Chips 🍫 | 1 cup | For crown contrast |
| Pistachios 🌰 | 1 cup | Shells removed, chopped fine |
| Powdered Sugar 🍚 | 1 cup | For crown dusting |
The cocoa powder is non-negotiable for that authentic Red Lobster flavor. Dutch-processed (like Hershey's Special Dark) gives the smoothest texture without bitterness. Whole Foods and Trader Joe's carry great brands—look for 100% cacao content. The pistachios should be shelled and lightly toasted (5 minutes at 350°F) for maximum crunch. For the chocolate chips, Ghirardelli or Guittard are my go-tos—they melt perfectly without seizing. Don't skimp on the butter; Plugrá or Land O'Lakes work best when cold and cubed.
No Dutch-processed cocoa? Natural cocoa plus 1/4 tsp baking soda mimics the effect. Running short on pistachios? Almonds or pecans work in a pinch, but toast them first. The white chocolate chips can be swapped for white chocolate bars chopped into chunks—just make sure they're high-quality (like Ghirardelli White Chocolate Baking Bars). For the sugars, superfine sugar blends better, but if you only have regular granulated, pulse it in a food processor until fine. The milk can be evaporated or condensed for extra richness, but whole milk gives the best texture.
Store the cake layers in an airtight container between parchment paper for up to 3 days—they actually taste better the next day. The chocolate crown components (chips, pistachios, powdered sugar) keep indefinitely in the pantry. For the wave technique, room-temperature buttercream is key—it spreads smoothly without tearing the layers. Assemble the cake 4 hours before serving to let the crown set properly. Leftovers? Slice and freeze individual portions—they reheat beautifully in the microwave with a splash of milk.
Why You'll Love This Recipe
- Here’s what sold me: I can make this for half the cost of a restaurant slice, and it tastes exactly like the one I’d splurge on. The butter and sugars do all the heavy lifting, so you’re not drowning in obscure ingredients. Plus, leftovers? They disappear faster than I can say “chocolate frosting.”
- One-Bowl Wonder: I swear by this recipe when I’m too tired for extra bowls. Just toss the flour, butter, sugars, and eggs into one mixer—no measuring cups left out to dry. The rich chocolatey frosting (made from the same ingredients, honestly) comes together while you’re still scraping the last bit of batter.
- Frosting That Sticks: That signature Red Lobster ripple effect? It’s all about the butter-to-sugar ratio here. The dark brown sugar caramelizes just enough to give it that deep, buttery crunch, while the granulated keeps it smooth. (Yes, even my kids—who hate cake—ask for seconds.)
- Party in a Box: Between us, this is my go-to for birthdays, holiday desserts, or just because. The cake layers perfectly for stacking, and the frosting’s sturdy enough to slice cleanly—no messy crumbles. Honestly, it’s the only dessert I bake that actually impresses people without me stressing.
Step-by-step instructions for copycat Red Lobster chocolate wave cake
Here's how to recreate that iconic restaurant dessert with rich fudgy layers and a crisp chocolate crown at home.
Prepare the Cake Batter for Maximum Moisture
Preheat your oven to 350°F and grease three 9-inch round cake pans with nonstick spray, then line the bottoms with parchment paper. In a stand mixer fitted with the paddle attachment, cream together the 2 cups unsalted butter and both sugars until light and fluffy—about 4-5 minutes. This step is crucial; you're looking for a pale, airy mixture that nearly doubles in volume.
Add the 4 whole large eggs one at a time, mixing well after each addition. Scrape down the sides of the bowl to ensure even incorporation. Then whisk in the 2 teaspoons vanilla extract and 1 cup milk until just combined. In a separate bowl, sift together the 2.5 cups all-purpose flour, 1 tablespoon baking powder, 0.5 teaspoon salt, and 0.75 cup unsweetened cocoa powder. Gradually add the dry ingredients to the wet mixture, mixing on low speed until just combined—don't overmix or your cake will be dense.
Fold in the 2 cups chocolate chips by hand using a rubber spatula, ensuring even distribution throughout the batter. This ensures every bite delivers that signature chocolatey punch. Divide the batter evenly among the prepared pans, tapping each gently on the counter to remove air bubbles. Bake for 30-35 minutes or until a toothpick inserted in the center comes out clean. Let the cakes cool in the pans for 10 minutes before transferring to a wire rack to cool completely.
Create the Signature Chocolate Crown
While the cakes are cooling, prepare the crown mixture. In a medium saucepan, combine the 1 cup white chocolate chips and 1 cup pistachios with 1 cup milk. Cook over low heat, stirring constantly, until the white chocolate is completely melted and the mixture is smooth—about 5-7 minutes. Remove from heat and let cool slightly, then fold in the 1 cup powdered sugar until fully incorporated. The mixture should be thick enough to hold its shape when spread but still pourable.
Here's the thing—this crown needs to be precise. Once the cakes are completely cool, place one cake layer on a serving plate and spread a thin layer of the white chocolate mixture over the top. You're not looking for a thick frosting here; just enough to create a base for the next layer. Repeat with the second and third cake layers, stacking them with the white chocolate mixture between each. The crown should be spread evenly over the top of the final layer, creating a smooth, even surface for the decorative wave pattern.
Shape and Chill the Crown for Perfect Texture
Use an offset spatula to spread the remaining white chocolate mixture over the top of the cake in a smooth, even layer. Here's where the magic happens: while the mixture is still wet, use a piping bag fitted with a star tip to create a wave pattern along the top edge of the cake. Press the tip firmly against the cake and drag it in a gentle wave motion, creating a textured, crunchy crown that mimics the restaurant version. Let the cake sit at room temperature for 15 minutes to allow the crown to set slightly before refrigerating.
Chill the cake in the refrigerator for at least 2 hours (or up to 24 hours) to allow the crown to fully harden and develop its signature crunch. This step is non-negotiable—rushing it will result in a sticky, messy crown instead of the crisp, textured finish you're after. Once chilled, the crown should be firm enough to hold its shape when sliced, with a delightful contrast between the creamy cake layers and the crunchy chocolate top.
Slice and Serve for Maximum Impact
To serve, use a long, serrated knife to slice through the crown and into the cake layers. The knife should glide through the cake with minimal resistance, and each slice should reveal the beautiful wave pattern of the crown. For the best presentation, serve the cake at room temperature—this allows the flavors to fully meld and the textures to contrast perfectly. The fudgy cake layers should be rich and moist, while the crown should offer a satisfying crunch with every bite.
Here's a pro tip: if you're serving the cake ahead of time, bring it to room temperature for 10-15 minutes before slicing. This ensures clean cuts and prevents the crown from crumbling. Each slice should be generous—this isn't a delicate dessert—so aim for thick pieces that showcase both the cake and the crown. Pair it with a scoop of vanilla ice cream for the ultimate indulgence, just like at Red Lobster.
Pro Tips For Making Copycat Red Lobster Chocolate Wave Cake
- Cream Butter Properly: The Red Lobster version relies on that signature buttery richness, so don’t just mix the butter and sugars—actually whip them together until the mixture looks like wet sand. I used to skip this, and the cake turned out dense and flat. Take your time here; it’s not just about aeration, it’s about flavor development.
- Measure Flour Right: Spoon that flour into the measuring cup and level it off with a knife—don’t scoop directly from the bag. Packing it down (even a little) makes the cake dry and crumbly. I learned this the hard way when my first attempt came out like a brick. The recipe counts on that light, fluffy texture, so be precise.
- Don’t Overmix the Batter: Once you add the eggs, mix just until combined—maybe 10-12 strokes max. Overmixing develops gluten, and that’s how you end up with a tough, chewy cake instead of the tender layers Red Lobster nails. Fold in the chocolate gently if it’s a separate step; rough handling = dense cake.
- Bake in Two Rounds: Split the batter evenly between two 9-inch pans (or one 9x13-inch pan if you’re shortcutting). The waves rely on thin, even layers, so resist the urge to overfill. I tried baking one giant pan once—ended up with a sad, uneven mess. Two rounds = perfect waves every time.
Storing and reheating this recipe
Refrigerator Storage
The fully assembled cake with its chocolate crown stays fresh in the refrigerator for up to 5 days when stored properly. I recommend wrapping it tightly in plastic wrap, then placing it in an airtight container with a parchment-lined lid to prevent moisture buildup.
The crown will maintain its crunch, though it may soften slightly after the first day—this is normal! Let it sit at room temperature for 30 minutes before serving to restore the crown's texture. 💫
Freezer Preservation
For longer storage, freeze the cake layers separately (before assembling) in individual quart-sized freezer bags. Wrap each layer tightly in plastic wrap first to prevent freezer burn. The crown components (melted white chocolate mixture) can be frozen separately in a silicone mold for up to 3 months.
When ready to serve, thaw the layers overnight in the fridge, then reassemble with the crown mixture. The texture will be slightly softer but still delicious.
Reheating Leftover Slices
Individual slices reheat beautifully in the microwave. Place a slice on a microwave-safe plate and cover it with a damp paper towel. Heat on 50% power for 10-15 seconds, then add another 5 seconds if needed.
The crown will soften slightly but regain its crunch when cooled. For oven reheating, bake at 300°F for 5-7 minutes to warm through while keeping the crown intact. 🔥
Crown Texture Recovery
If your crown loses its crunch after storage, don't worry—it's fixable! Sprinkle the top with powdered sugar and microwave for 5 seconds to crisp it back up. For a more dramatic effect, use a kitchen torch to lightly toast the crown's surface.
This works especially well if you're serving the cake after it's been refrigerated overnight.
Make-Ahead Assembly
Assemble the cake 24 hours ahead of time for the best results. The crown will have time to fully set, and the flavors will meld beautifully. Store it in the fridge until serving day.
When ready to serve, let it sit at room temperature for 1 hour before slicing. This timing ensures clean cuts and maintains that perfect wave pattern we worked so hard to create. ⏰
Nutrition facts
Frequently asked questions
Why does the Red Lobster cake have that signature wave pattern?
The wave pattern isn't just decorative—it's functional! The crown's texture contrasts perfectly with the fudgy layers, creating a satisfying crunch. The technique uses a piping bag with a star tip to create ridges while the white chocolate mixture is still wet, then chilling sets the pattern permanently. Think of it as edible art that also enhances texture!
Can I make this cake in a different size pan?
Yes, but adjust baking times carefully. For 8-inch pans, bake 25-30 minutes—they'll cook faster. For 10-inch pans, increase to 35-40 minutes. The key is checking with a toothpick (clean exit = done). Just remember: smaller pans mean thicker layers, which may need slightly less baking time.
What's the secret to getting the crown to stay crunchy?
Three things: proper chilling, powdered sugar, and patience. Chill the cake at least 2 hours (overnight is better). The powdered sugar in the crown mixture helps stabilize the texture. If it softens, microwave with a damp paper towel for 5 seconds**—this crisps it back up instantly. Never skip the chilling step!
How do I fix cracked cake layers?
Cracks usually mean overbaking or under-mixing. For future attempts, bake until just set (toothpick test) and mix dry ingredients until just combined. To salvage a cracked cake: spread a thin layer of warmed buttercream between layers (instead of the white chocolate mixture) and decorate with extra chocolate shards to hide imperfections. The crown will still taste amazing!
Can I make this cake gluten-free?
Swap the all-purpose flour for a 1:1 gluten-free baking flour blend (like Bob's Red Mill). Add 1/2 teaspoon xanthan gum to help bind the layers. The texture will be slightly denser but still delicious. For the crown, ensure your white chocolate is gluten-free (check labels—some brands process in shared facilities).