Desserts
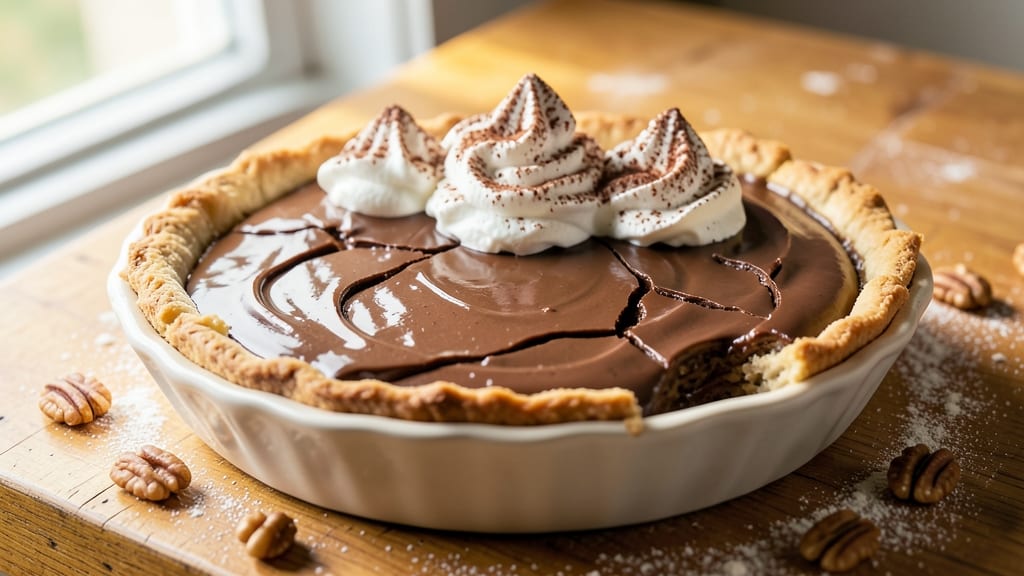
Grandma's chocolate pie recipe is the one that always brings back memories of Sunday afternoons spent in my Nonna's kitchen, where the scent of cocoa and cinnamon filled the air. 💛 The secret to this pie isn't just the rich, velvety filling—it's the fudgy crust that holds together perfectly, creating layers of decadence in every bite.
I've perfected this recipe over years, testing it in my own cramped Boston kitchen until I got it just right.
What makes this chocolate pie special is how it balances simplicity with indulgence. You can use a store-bought crust for convenience, or roll out your own with just a few ingredients—either way, the result is the same: a golden, slightly crispy base that supports the luxurious chocolate filling.
The custard-like center is silky smooth, with just the right amount of cocoa to satisfy even the most serious chocolate lovers.
By the time it comes out of the oven, you'll have a pie that looks like something from a bakery window—glossy, inviting, and impossible to resist. The edges will be just set, the center still slightly jiggly, and the aroma will fill your kitchen with warmth.
This is the kind of dessert that feels like a hug, perfect for holidays, family gatherings, or whenever you need a little taste of home.
Serve it warm with a scoop of vanilla ice cream or dusted with powdered sugar for that classic touch. The best part? It keeps well for days, so you can enjoy slices whenever the craving hits. Let's get baking!
Ingredients for grandma's chocolate pie
Just 11 ingredients for a pie that tastes like Nonna's kitchen hug.
| Ingredient | Amount | Notes |
|---|---|---|
| All-Purpose Flour 🌾 | 2 cups | For crust and filling |
| Unsalted Butter 🧈 | 1 ½ cups | Cold, cubed for crust |
| Granulated Sugar 🍬 | 1 ½ cups | Divided for crust and filling |
| Cocoa Powder 🍫 | 1 cup | Natural, unsweetened cocoa |
| Large Eggs 🥚 | 3 whole | Room temperature preferred |
| Vanilla Extract 🌸 | 1 tbsp | Pure, high-quality extract |
| Milk 🥛 | 1 cup | Whole milk for richness |
| Salt 🧂 | ½ tsp | Fine sea salt preferred |
| Ground Cinnamon 🍃 | 1 tsp | Freshly ground for warmth |
| Vanilla Ice Cream 🍦 | 1 ½ cups | For serving (optional) |
| Powdered Sugar 🍬 | ¼ cup | For dusting (optional) |
The cocoa is everything. Hershey's Special Dark or Dutch-processed cocoa gives that deep, velvety flavor—none of that bitter stuff. I grab mine at Trader Joe's in the bulk section, but any natural cocoa will work. The butter? Plugrá or Land O'Lakes work great, but if you've got European-style butter (like President or Bregott), use it—it's worth the splurge. For the crust, keep everything cold. I even chill my measuring cups in the freezer for 10 minutes before mixing. The secret to that perfect fudgy crust? Don't overwork it. Just press it in, don't roll it out.
No vanilla extract? Seeds from a vanilla bean steeped in warm milk work beautifully (just crush a bean and let it sit for 10 minutes). Short on sugar? Maple syrup or honey at half the amount adds moisture but changes the texture slightly. The crust can be store-bought if you're in a rush—Pepperidge Farm or Whole Foods crusts both work, but they won't be as fudgy. For the filling, if you're worried about curdling, whisk the eggs and sugar together first, then add the hot milk gradually. And trust me on the cinnamon—it's subtle but makes the whole pie sing.
This pie gets better as it sits—24 hours is ideal if you can wait. Store it in an airtight container at room temperature, covered loosely with plastic wrap. The crust stays crispy for 3 days, but the filling starts to separate after that. For make-ahead, bake it a day early and reheat slices in the oven at 350°F for 10 minutes. Freeze portions for up to 3 months—just thaw overnight in the fridge. And if someone asks for seconds? You'll know you did it right.
Why You'll Love This Recipe
- No-Fuss Crust: I swear by the butter-and-flour shortcrust here—just mix, press, bake. No rolling pins, no fuss, and it stays tender even when the filling gets warm. The secret? Chilling the dough for 20 minutes while you make the filling. Trust me, it’s worth the wait.
- Rich Without Guilt: That cocoa powder isn’t just any cocoa—it’s the good stuff, melted into butter first for a velvety texture. The sugar caramelizes just enough to give it that classic Grandma vibe, but the eggs keep it from being too heavy. One bite, and you’re hooked. (Yes, even on a Tuesday night.)
- Double-Duty Dessert: This pie is my secret weapon for potlucks, birthday cakes, or just because. Serve it warm with vanilla ice cream, or let it chill overnight for a no-bake breakfast the next day. Honestly, the leftovers taste even better—like a hug in pie form.
- Budget-Friendly Luxury: All those pantry staples? They add up to something that feels special without breaking the bank. A stick of butter, a bag of flour, a handful of sugar—it’s the kind of recipe that makes you feel like you’re baking for company, even if it’s just you and a spoon. (My daughter picks out the cocoa powder, but still asks for seconds.)
Step-by-step instructions for Grandma's chocolate pie recipe
Here's how to create that perfect balance of fudgy crust and rich cocoa filling—just like Grandma used to make.
👨🍳 Step 1: Prepare the Fudgy Crust
In a large bowl, combine the 2 cups all-purpose flour, 0.5 tsp salt, and 1 tsp ground cinnamon. Cut in the 1.5 cups cold, cubed unsalted butter using a pastry cutter or your fingers until the mixture resembles coarse crumbs with pea-sized butter pieces. This texture is crucial—it creates that signature flaky, yet dense crust.
Gradually add ½ cup of the 1.5 cups granulated sugar and mix until just combined. Press the dough evenly into a 9-inch pie dish, creating a ¼-inch thick layer. Use your fingers to smooth the edges and create a slight rim. Chill the crust in the refrigerator for 30 minutes while you prepare the filling. The cold dough prevents shrinking during baking.
🍳 Step 2: Make the Velvety Chocolate Filling
In a medium saucepan, melt the remaining 1 cup granulated sugar with the 1 cup milk over medium heat, stirring constantly until the sugar dissolves completely. Remove from heat and whisk in the 1 cup cocoa powder until smooth. Return the pan to low heat and cook for 5-7 minutes, stirring constantly, until the mixture thickens to a pudding-like consistency.
In a separate bowl, whisk together the 3 whole large eggs and 1 tbsp vanilla extract. Slowly pour the egg mixture into the warm chocolate mixture while whisking vigorously. This step is critical—it prevents curdling and creates that signature silky texture. Pour the filling into the chilled pie crust, spreading it evenly.
🔥 Step 3: Bake to Golden Perfection
Preheat your oven to 350°F. Bake the pie for 45-50 minutes until the edges are set and the center still has a slight wobble (it'll firm up as it cools). Here's the thing—don't overbake. You want that rich, fudgy texture, not a dry pie. A toothpick inserted in the center should come out with a few moist crumbs, not completely clean.
While the pie bakes, sprinkle the remaining ½ cup granulated sugar evenly over the top. This creates that beautiful caramelized crust while adding just the right amount of sweetness. The sugar will melt and form a glossy layer as it bakes. Let the pie cool completely on a wire rack before slicing—this ensures clean cuts and prevents a runny filling.
🍽️ Step 4: Serve with Optional Ice Cream
Once completely cooled, dust the top with 0.25 cup powdered sugar using a fine-mesh sieve for an elegant finish. This step is optional but adds that restaurant-quality presentation. Serve each slice warm or at room temperature with 1.5 cups vanilla ice cream on the side for that classic pie-and-ice-cream combination.
Real talk—the best way to enjoy this pie is straight from the fridge after it's been chilling for at least 2 hours. The contrast between the warm filling and cold ice cream makes every bite unforgettable. Store leftovers covered in the refrigerator for up to 4 days, though I doubt it'll last that long!
Pro Tips For Making Grandma'S Chocolate Pie
- Sift That Cocoa: I learned this the hard way—lumpy cocoa powder ruins everything. Sift it with the flour before mixing, especially if your recipe calls for a smooth filling. No sifter? Use a fine-mesh strainer and tap it gently. Trust me, your pie’s texture will thank you.
- Melt Butter Slowly: Grandma’s recipe likely uses butter for richness, and rushing this step is a mistake. Melt it over low heat or in a microwave (30-second bursts) until just liquid—no browning. Overcooked butter adds bitterness, and nobody wants that in their chocolate pie.
- Whisk Eggs Cold: Beat those eggs at room temperature for a creamier filling. Cold eggs whip up tougher and can curdle when mixed with hot butter. Pop them in a warm bowl for 10 minutes if you’re in a hurry—your pie’s consistency will be smoother.
- Skip the Overmixing: Once the flour and cocoa are mixed into the wet ingredients, stop stirring after just a few turns. Overworking the batter introduces air bubbles that make the pie dense. A quick fold is all you need—less effort, better result.
Creative variations of this dish
Nonna’s Italian Twist
Skip the crust entirely and bake this pie in a deep 9-inch cast iron skillet—just like Nonna used to make. Line the skillet with parchment paper cut to fit, then pour the filling directly in. Bake at 350°F for 40 minutes until the edges are set.
The cast iron adds a subtle smoky depth that pairs beautifully with the chocolate. Serve straight from the skillet with a dollop of mascarpone cheese instead of ice cream. 🍫
Spiced Rum Filling
For a grown-up version, add 1 tbsp dark rum (like Kahlúa) to the warm chocolate mixture before adding the eggs. The alcohol cooks off but leaves behind warm, boozy notes. I also fold in ½ tsp freshly grated nutmeg and a pinch of cayenne pepper for a subtle kick.
This works especially well if you're serving it with Baileys-spiked whipped cream. 🍸
Peanut Butter Swirl
After pouring the chocolate filling into the crust, drop 12 dollops of creamy peanut butter (like Jif or Skippy) evenly across the surface. Use a knife to swirl it gently into the filling before baking.
The peanut butter melts into little ribbons, creating pockets of nutty goodness in every bite. Top with chopped peanuts after baking for extra crunch. 🥜
Salted Caramel Topping
For a showstopper dessert, drizzle ½ cup warm salted caramel sauce (store-bought or homemade) over the cooled pie. Let it set for 10 minutes before slicing so it doesn’t slide off.
I like to use Trader Joe’s salted caramel sauce for convenience, but homemade with butter, brown sugar, and flaky sea salt tastes even better. Add flaky sea salt crystals on top for contrast. 🍯
Espresso Boost
Replace ¼ cup of the milk with espresso or strong brewed coffee for a mocha-inspired twist. The coffee enhances the chocolate flavor without making it bitter. I use 3 shots of espresso (about ½ cup) for the perfect balance.
This version is a crowd-pleaser at coffee shops and pairs beautifully with vanilla bean ice cream. ☕
Gluten-Free Crust
For a gluten-free version, swap the all-purpose flour for a 1:1 gluten-free flour blend (like Bob’s Red Mill). Add ½ tsp xanthan gum to help bind the crust. The filling stays the same, but the crust will be slightly denser.
Chill it for 45 minutes before baking to ensure it holds together. This version is just as rich and satisfying! 🌾
Nutrition facts
Frequently asked questions about Grandma's chocolate pie
Can I make this pie without a crust?
For Nonna's Italian twist, bake it in a 9-inch cast iron skillet lined with parchment paper. The filling thickens beautifully without a crust, and the skillet adds a smoky depth. Serve with mascarpone instead of ice cream for an authentic touch.
Why does my chocolate filling get grainy?
Graininess usually means the eggs curdled. Always whisk the eggs and sugar together first, then slowly pour into the warm chocolate mixture while whisking constantly. If it happens, strain the filling through a fine-mesh sieve before pouring into the crust.
How do I prevent the crust from shrinking?
Keep everything cold—chill your measuring cups in the freezer for 10 minutes before mixing. Press the dough firmly into the pie dish, creating a slight rim, and chill for 30 minutes before baking. The cold dough prevents shrinking during baking.
Can I make this pie ahead of time?
This pie gets better as it sits! Bake it a day ahead and store covered at room temperature. The flavors meld beautifully. For longer storage, refrigerate for up to 4 days or freeze portions for 3 months. Thaw overnight in the fridge.
What's the best way to serve it?
Serve warm with vanilla ice cream or at room temperature dusted with powdered sugar. For a restaurant touch, drizzle with salted caramel and flaky sea salt. The contrast of warm filling with cold ice cream makes every bite unforgettable!