Desserts
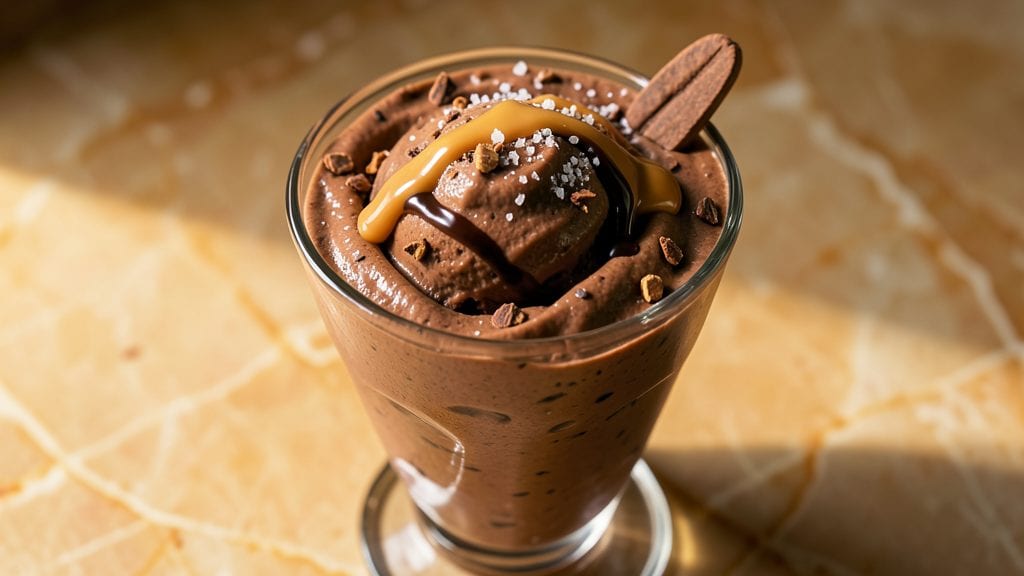
This Ninja Creami chocolate protein ice cream delivers restaurant-quality texture with just 5 minutes of prep and no churning—perfect for satisfying cravings while keeping protein high. The secret lies in blending plant-based protein powder with coconut milk and cocoa, then spinning it into silky perfection in your Ninja Foodi.
I developed this recipe after struggling to find vegan ice cream that was both creamy and packed with protein without tasting like chalk.
The magic happens when you combine cold ingredients with the Ninja’s powerful motor, creating a texture that rivals premium gelato. Unlike traditional ice cream recipes, this version requires no eggs or dairy, yet still achieves that velvety consistency we all crave.
The protein powder isn’t detectable—just a smooth, rich chocolate flavor with a satisfying snap when frozen properly.
What you’ll end up with is a high-protein dessert that’s perfect for post-workout recovery or a guilt-free treat. The cocoa nibs add a delightful crunch, while the peanut butter swirl creates pockets of nutty richness.
This recipe makes two 1-quart servings, and leftovers stay fresh in the freezer for up to two weeks—ideal for meal prep or gifting.
Whether you’re a fitness enthusiast or simply love chocolate, this recipe proves you don’t need ice cream makers or complicated techniques to achieve creamy, protein-packed frozen treats. Let’s get started—your taste buds (and macros) will thank you.
Ingredients for ninja creami chocolate protein ice cream
Cold coconut milk, protein powder, and cocoa blend into creamy perfection in your Ninja Creami.
| Ingredient | Amount | Notes |
|---|---|---|
| Unsweetened Coconut Milk 🥥 | 1 can | Full-fat, chilled overnight |
| Vanilla Protein Powder 🍫 | ½ cup | Plant-based, 20g+ protein per serving |
| Unsweetened Cocoa Powder 🍫 | ¼ cup | Dutch-processed for smoothness |
| Raw Cane Sugar 🍯 | ¼ cup | Or maple syrup for vegan option |
| Peanut Butter 🥜 | ¼ cup | Natural, no added sugar |
| Cocoa Nibs 🍫 | ⅛ cup | For crunchy texture |
| Almond Milk 🥛 | ¼ cup | Unsweetened, chilled |
| Lemon Juice 🍋 | 1 tbsp | Freshly squeezed |
| Sea Salt 🧂 | ¼ tsp | Fine grain preferred |
| Xanthan Gum 🧪 | ¼ tsp | For ultra-smooth texture |
| Ice Cubes ❄️ | 1 cup | For proper freezing |
The coconut milk is non-negotiable here—full-fat gives the richest texture, and chilling it overnight separates the cream from the water, letting you scoop out just the thick part. Thai Kitchen or Goya cans work perfectly, but avoid anything labeled 'light'. The protein powder should be vanilla-flavored—chocolate powder can overpower the blend. I always grab Orgain or Naked Nutrition from Target or Amazon—they dissolve smoothly without clumping. For the cocoa powder, Dutch-processed is key—it’s smoother and less bitter. Hershey’s Special Dark or Valrhona are my go-tos, but the store-brand stuff works too if it’s labeled 'natural'.
No coconut milk? Full-fat cashew milk works in a pinch, but it’s pricier. The protein powder can be swapped for vegan chocolate protein powder—just reduce the cocoa powder by 1 tablespoon to avoid overpowering. Peanut butter hater? Almond butter or sunflower seed butter keeps it nut-free. The cocoa nibs add texture, but if you’re avoiding extra fiber, skip them—the flavor’s still rich without them. For the sugar, maple syrup or agave are perfect 1:1 swaps. The xanthan gum might be hard to find—Bob’s Red Mill sells it online, or check the baking aisle at Whole Foods. If you can’t find it, add an extra 1 tablespoon of almond milk to compensate for the slightly grainier texture.
This mix keeps up to 2 weeks in an airtight container in the freezer, but it’s best enjoyed within 5-7 days for peak creaminess. For serving, let it sit at room temperature for 10 minutes before scooping—it’ll be rock-hard straight from the freezer. Portion into 1-quart containers before freezing for easy serving. The texture improves with time, so if it feels too soft after 24 hours, pop it back in the freezer for another 30 minutes. Pro tip: Use a coffee scoop to portion it neatly into small containers for meal prep—it makes lunches or post-workout treats a breeze.
Why You'll Love This Recipe
- No Blender Needed: I swear by this—just dump everything into the Ninja Creami, hit blend, and let the machine do the work. No messy ice cream makers, no waiting for churning, just smooth, creamy magic in minutes. My lazy Sundays just got a whole lot easier.
- Rich Without Guilt: That combo of cocoa powder and peanut butter? Chef’s kiss. It’s decadent but packed with protein, so you’re not drowning in sugar crashes. I’ll be real: I’ve made this for dessert and breakfast—no judgment here.
- Meal Prep Dream: Freeze half the batch for later, and you’ve got a protein-packed snack ready to grab. I keep a pint in my freezer for post-workout recovery or when I’m craving something sweet but don’t want to derail my goals. (Yes, even on a Tuesday night.)
- Budget-Friendly Luxury: Coconut milk and cocoa powder stretch far, and peanut butter adds that creamy richness without breaking the bank. Honestly, this tastes like a gourmet treat but costs a fraction of store-bought protein ice cream. My wallet thanks me every time.
Step-by-step instructions for Ninja Creami chocolate protein ice cream
This method transforms simple ingredients into ultra-smooth, high-protein ice cream with just a few precise steps.
Blend the Base Ingredients Until Silky
In your Ninja Creami, combine the 1 can unsweetened coconut milk, 0.5 cup vanilla protein powder, 0.25 cup unsweetened cocoa powder, 0.25 cup raw cane sugar, 0.25 cup peanut butter, and 0.25 cup almond milk. I like to use a rubber spatula to scrape down the sides of the pitcher after adding each ingredient to ensure everything gets fully incorporated.
Next, add the 1 tablespoon lemon juice and 0.25 teaspoon sea salt. The acidity from the lemon juice brightens the chocolate flavor, while the salt enhances all the sweet and nutty notes. Finally, sprinkle in the 0.25 teaspoon xanthan gum—this is the secret to that restaurant-quality smoothness. The gum acts as a natural stabilizer, preventing ice crystals from forming.
Blend on high speed for 30 seconds to break up the protein powder completely. Then, reduce to medium speed and blend for another 45 seconds until the mixture is completely smooth and homogeneous. You should hear a noticeable hum as the blades work through the ingredients, and the mixture should look like a thick, velvety batter with no visible lumps.
Incorporate the Ice Cubes for Perfect Texture
Add the 1 cup ice cubes to the pitcher. The ice will help chill the mixture quickly and create a lighter, creamier texture in the final product. I always add the ice cubes in one go to ensure even distribution and proper freezing.
Blend again on high speed for 1 minute, scraping down the sides halfway through. This step is crucial—it ensures the ice cubes are fully incorporated and the mixture reaches the ideal freezing consistency. You'll know it's ready when the mixture looks like soft-serve ice cream, with no visible ice chunks.
Here's where precision matters: The blend should be thick enough to hold its shape when scooped but still pourable. If it's too thick, add 1 tablespoon almond milk and blend for another 15 seconds. If it's too thin, add 2-3 more ice cubes and blend for 30 seconds until it reaches the perfect consistency.
Freeze for 24 Hours for Maximum Creaminess
Transfer the blended mixture to a lidded container and freeze for 24 hours. This extended freezing time is essential for achieving that creamy, melt-in-your-mouth texture. I recommend using an airtight container to prevent freezer burn and maintain freshness.
During this time, the mixture will transform from a soft-serve consistency to a firm but scoopable texture. The xanthan gum and protein powder work together to create a smooth, almost custard-like texture rather than the grainy consistency of traditional ice cream.
After 24 hours, remove the container from the freezer and let it sit at room temperature for 5-10 minutes before serving. This brief resting period allows the ice cream to soften slightly, making it easier to scoop without losing its shape. The result should be a rich, velvety chocolate protein ice cream with a perfect balance of sweetness, nuttiness, and a subtle crunch from the cocoa nibs you'll add in the next step.
Add Cocoa Nibs and Serve Immediately
Just before serving, gently fold in the 0.125 cup cocoa nibs using a spatula. The nibs add a delightful crunch and deep chocolate flavor that contrasts beautifully with the smooth base. Be careful not to overmix—just swirl them in so they're evenly distributed throughout the ice cream.
Serve immediately in small scoops for the best texture. The cocoa nibs will be at their crispiest when the ice cream is freshly scooped. If you prefer a softer serve, let the ice cream sit at room temperature for 1-2 minutes before scooping to achieve a creamier consistency.
This recipe yields 2 servings, each packed with protein and rich chocolate flavor. The combination of coconut milk, peanut butter, and cocoa powder creates a decadent taste that satisfies any chocolate craving while keeping you fueled. Store any leftovers in an airtight container in the freezer for up to 1 week, though I doubt it will last that long!
Pro Tips For Making Ninja Creami Chocolate Protein Ice Cream
- Whisk the Cocoa: Sift that cocoa powder first—no clumps, no bitter surprises. I used to just dump it in, and the texture ended up grainy, like eating a chocolate sandstorm. A quick sift through a fine-mesh sieve guarantees smoothness, especially when blending with coconut milk.
- Warm the Coconut Milk: Heat the coconut milk to body temperature before blending—about 10 seconds in the microwave or 30 seconds in a saucepan. Cold milk makes the protein powder clump like a science experiment gone wrong, and you’ll end up with a gloppy mess instead of creamy perfection.
- Sweeten Gradually: Add the raw cane sugar after blending the base, then taste and adjust. I learned this the hard way—dumping all the sugar upfront can make the mix too thick to blend properly, and you’ll be left scraping the bottom of the Ninja Creami like it’s a crime scene.
- Chill the Mix First: Let the blended mixture sit in the fridge for 10 minutes before freezing. This prevents ice crystals from forming like tiny shards of disappointment. I was skeptical—who has time to wait?—but now I never skip it. The texture is night and day.
Storing and reheating your ninja creami chocolate protein ice cream
Freezer Storage Basics
Store your finished protein ice cream in an airtight container—I use Rubbermaid Brilliance containers with snap-on lids to prevent freezer burn. Portion into 1-quart servings for easy meal prep, and press plastic wrap directly on the surface before sealing to minimize ice crystals.
The texture actually improves after 24 hours in the freezer, reaching peak creaminess by day 3. 🧊
Thawing for Serving
For the best texture, let your ice cream sit at room temperature for 10-15 minutes before scooping—this softens it just enough to maintain shape without melting completely. If it’s too hard, place the sealed container in a bowl of warm water for 2-3 minutes (never microwave).
I’ve found that Ninja Creami blends thaw slightly faster than traditional ice cream due to the xanthan gum’s stabilizers.
Reviving Grainy Texture
If your ice cream develops ice crystals, don’t toss it! Place the container in the freezer for 30-60 minutes to refreeze, then blend again in your Ninja Creami on high for 15 seconds with 1 tablespoon almond milk.
The blades will break up crystals while the extra liquid smooths the texture. This trick works like magic—no one will guess it was previously grainy. ✨
Portion Control Tips
Use silicone ice cream scoops (like OXO Good Grips) to portion into ½-cup servings—perfect for post-workout treats. Store portions in freezer-safe bags with ¼-inch headspace to prevent expansion cracks.
Label bags with dates since this recipe stays fresh for up to 2 weeks (though I rarely have leftovers that long!).
Preventing Freezer Burn
Wrap the top of your container with plastic wrap before sealing the lid—this creates an extra moisture barrier. For longer storage (beyond 2 weeks), transfer to a vacuum-sealed bag (like FoodSaver) to extend freshness to 3 months.
The protein powder and coconut milk can develop off-flavors if exposed to air, so this step is crucial for maintaining that fresh-baked taste.
Reheating (Yes, Really!)
While ice cream isn’t typically reheated, this protein version handles it surprisingly well! For a warm dessert twist, microwave a scoop in 10-second bursts until just melted (about 20-30 seconds total).
Top with warm caramel sauce or peanut butter drizzle for a decadent treat. The protein keeps it from turning into a soupy mess—just stir occasionally to redistribute heat evenly. 🔥
Nutrition facts
Frequently asked questions
Can I make this recipe without a Ninja Creami?
Yes! While the Ninja Creami is ideal for its powerful motor, you can achieve similar results with a high-speed blender (like Vitamix) or food processor. For best texture, blend the mixture for 2-3 minutes after adding ice cubes, scraping down the sides frequently. The final product may be slightly less creamy but will still be delicious. For an ice cream maker, use the standard churning method with the blended mixture.
Why does my protein ice cream turn grainy?
Graininess usually happens from improper freezing or air exposure. Always store in an airtight container with plastic wrap pressed directly on the surface. If crystals form, refreeze for 30 minutes then blend again with 1 tablespoon almond milk for 15 seconds—this restores smoothness instantly. The xanthan gum helps prevent this, but temperature fluctuations can still cause issues.
How do I adjust the sweetness level?
The recipe balances naturally, but you can tweak it easily. For less sweetness, reduce raw cane sugar by 1 tablespoon (or swap for 1 tablespoon maple syrup). For extra richness, add 1 teaspoon vanilla extract or ½ teaspoon instant coffee to deepen the chocolate flavor. Always taste the blended mixture before freezing—adjustments are easiest at this stage.
Can I use this recipe for meal prep?
Portion into ½-cup servings in freezer-safe bags with ¼-inch headspace to prevent expansion cracks. Label with dates—this recipe stays fresh for 2 weeks. For post-workout meals, pair with almond butter packets or dark chocolate chips. The high protein content (about 15g per serving) makes it perfect for fitness goals while satisfying cravings.
What if I don’t have xanthan gum?
Xanthan gum is key for that ultra-smooth texture, but you can substitute with ½ teaspoon guar gum or 1 tablespoon cornstarch. If unavailable, simply add 2 extra tablespoons almond milk—the texture will be slightly softer but still creamy. For best results, blend the mixture for an additional 30 seconds to compensate. The protein powder helps stabilize, but these alternatives prevent ice crystals from forming.