Desserts
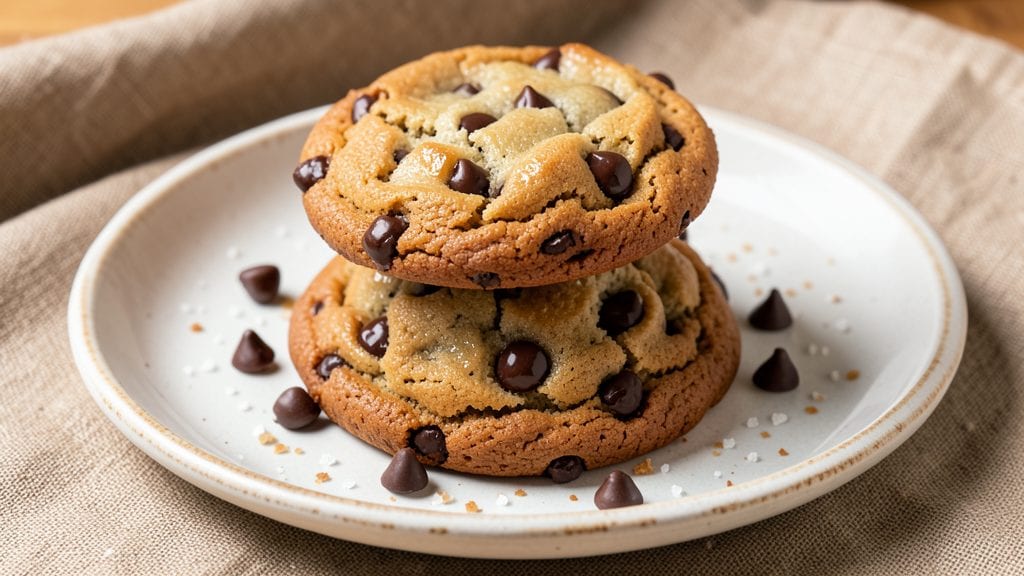
This Sally's chewy chocolate chip cookie recipe delivers the perfect balance of crispy edges and gooey centers that make every bite irresistible. After years of perfecting the technique, I've cracked the code for that signature texture that keeps cookies fresh-tasting even after cooling.
The secret lies in precise ingredient ratios and baking at just the right temperature—no guesswork involved.
What sets these apart from standard recipes is the use of both brown and white sugar for depth of flavor, combined with a higher proportion of butter for that signature chewy texture.
I also insist on using high-quality chocolate chips that melt beautifully without turning grainy. The dough gets chilled before baking to prevent excessive spreading, ensuring those coveted thick cookies with crisp edges.
By the time these emerge from the oven, you'll have golden-brown cookies with crispy edges that give way to warm, chewy centers still soft at the core. The chocolate chips remain melty, creating pockets of rich, gooey goodness in every bite.
These cookies stay fresh for days, making them perfect for holiday baking or satisfying that afternoon sweet tooth.
For those who love to experiment, try adding a pinch of sea salt or swapping regular butter for browned butter for even deeper flavor. Serve warm with a glass of milk for the ultimate comfort experience. Let's get baking!
Ingredients for sally's chewy chocolate chip cookie
Gather these 10 essential ingredients for cookies that stay chewy and crispy for days.
| Ingredient | Amount | Notes |
|---|---|---|
| Unsalted Butter 🧈 | 1 cup | Cold and cubed for texture |
| Granulated White Sugar 🍚 | ¾ cup | Superfine preferred for smoothness |
| Packed Light Brown Sugar 🍚 | ¾ cup | Moisture for chewiness |
| Large Eggs 🥚 | 2 whole | Room temperature for even mixing |
| Pure Vanilla Extract 🌿 | 2 tsp | High-quality for deep flavor |
| All-Purpose Flour 🌾 | 2 ½ cups | Sifted for light texture |
| Sea Salt 🧂 | 1 ½ tsp | Fine grain for even distribution |
| High-Quality Chocolate Chips 🍫 | 2 cups | Enjoy Life or Guittard preferred |
| Baking Soda 🧪 | ½ tsp | For lift and crisp edges |
| Ground Cinnamon 🌶️ | ½ tsp | Optional for warmth |
The butter is non-negotiable—use unsalted and let it sit out just until soft (not melted). Plugrá or Land O'Lakes work great, but avoid anything with salt additives. The sugars? White for crisp edges, brown for chewiness—don't substitute with powdered. For chocolate chips, Enjoy Life or Guittard melt beautifully without graininess. The vanilla extract should be pure—Nielsen-Massey is my go-to. Flour matters too: King Arthur or Gold Medal give consistent results. Pre-sift your dry ingredients to avoid lumps—trust me on this one.
Short on brown sugar? White sugar plus 1 tsp molasses works in a pinch. No vanilla? Almond extract at half the amount adds depth. Running low on chocolate chips? Chopped chocolate bars (70% dark or semi-sweet) taste just as good. The cinnamon is optional but adds warmth—Penzeys has the best ground spice if you're splurging. For the sea salt, Maldon or Diamond Crystal flakes dissolve better than regular table salt. And if you're feeling fancy, browned butter replaces regular butter for nutty flavor (just cool it completely before mixing).
Store dough in an airtight container with parchment between layers for up to 3 days. Baked cookies stay fresh for 5 days in a sealed container or 3 months frozen between parchment. For extra crispiness, reheat at 300°F for 5 minutes. These cookies reheat beautifully—just wrap them in foil to prevent over-browning. Double the recipe? Use two cookie sheets for even baking. The secret to perfect cookies? Chill the dough for at least 2 hours—this prevents spreading and ensures thick, chewy centers.
Why You'll Love This Recipe
- That classic 1: 1 ratio of white and brown sugar? It’s what makes these cookies ridiculously good—the crisp edges and caramelized chew you can’t get with just one sugar. And the vanilla? Honestly, I double it sometimes because it’s that good.
- No Mixing Madness: I swear by the creamy butter-and-sugar combo here—just mix it all with a wooden spoon until it almost comes together, then fold in the chips. No food processor, no overworking the dough, just that perfect under-mixed texture that gives you chewy centers every time.
- Butter-Sugar Magic: That classic 1:1 ratio of white and brown sugar? It’s what makes these cookies ridiculously good—the crisp edges and caramelized chew you can’t get with just one sugar. And the vanilla? Honestly, I double it sometimes because it’s that good.
- Party in a Jar: Between us, these freeze like a dream—just portion the dough into balls, stick them in a bag, and pull them out when you need a last-minute treat. Or bake a tray ahead for game day, potlucks, or when your kid’s teacher asks for class cookies (again).
Step-by-step instructions for Sally's chewy chocolate chip cookies
Here's the method that delivers Sally's legendary cookies—crisp edges, chewy centers, and perfect chocolate melts every single time.
Cream the Butter and Sugars to Peak Fluffiness
In a stand mixer fitted with the paddle attachment, beat the 1 cup unsalted butter (cold and cubed) with the 0.75 cup granulated white sugar and 0.75 cup packed light brown sugar on medium speed for 3-4 minutes. You're aiming for a light, airy texture that nearly doubles in volume—this is what creates those crackly tops and chewy texture. The butter should be pale and fluffy, not greasy, when you're done.
Here's the thing—don't rush this step. The creaming process incorporates air into the dough, which is what makes these cookies so special. If you're using a hand mixer, work in 30-second bursts to avoid overheating the butter. You'll know it's ready when you pull the paddle out and see ribbons of butter clinging to it.
Add Eggs and Vanilla for Perfect Moisture Balance
Add the 2 whole large eggs (room temperature) one at a time, mixing on low speed for 30 seconds after each addition. Then stir in the 2 teaspoons pure vanilla extract and mix for another 10 seconds. The mixture will look slightly curdled at first, but that's normal—it will come together when you add the dry ingredients.
This is where the magic happens for that perfect chew. The eggs provide structure and moisture, while the vanilla adds depth of flavor. I always use room temperature eggs because they mix more smoothly and distribute evenly throughout the dough. If your eggs are straight from the fridge, let them sit in warm water for 5 minutes before using.
Combine Dry Ingredients for Light, Airy Texture
In a separate bowl, whisk together the 2.5 cups all-purpose flour, 1.5 teaspoons sea salt, 0.5 teaspoon baking soda, and 0.5 teaspoon ground cinnamon. Then gradually add this mixture to the wet ingredients, mixing on low speed for 30-45 seconds until just combined. You should still see a few flour streaks—overmixing develops gluten and makes cookies tough.
This is the moment that matters: don't overdo it. The dough should come together but still look slightly shaggy. Once combined, remove the bowl from the mixer and gently fold in the 2 cups high-quality chocolate chips using a silicone spatula. Make sure they're evenly distributed throughout the dough—you want melty pockets in every bite.
Chill the Dough for Perfect Shape and Flavor
Cover the bowl with plastic wrap and refrigerate for at least 30 minutes (I prefer 1 hour or even overnight). This chilling step is non-negotiable—it solidifies the butter, which prevents the cookies from spreading too thin in the oven. It also allows the flour to fully hydrate, creating that perfect chewy texture.
Real talk: Skipping this step is a mistake. Cold dough means the cookies hold their shape better, resulting in thicker cookies with crispy edges and gooey centers. Plus, the flavors have time to meld during chilling, making each bite even more delicious. If you're short on time, at least 20 minutes in the fridge will help, but 1 hour is ideal.
Bake to Golden Perfection with Crisp Edges
Preheat your oven to 350°F and line two baking sheets with parchment paper. Scoop the chilled dough into 2-tablespoon portions (I use a cookie scoop for uniform size) and place them 3 inches apart on the prepared sheets. The dough will be cold and firm—don't worry, it softens as it bakes.
Bake for 11-13 minutes until the edges are golden brown but the centers still look slightly underdone. They'll continue cooking on the hot pan after you remove them from the oven. Let them cool on the baking sheet for 5 minutes before transferring to a wire rack. Enjoy them warm for the ultimate experience—each bite should deliver crispy edges, a soft center, and melty chocolate in every forkful.
Pro Tips For Making Sally'S Chewy Chocolate Chip Cookie
- Cream Butter Slowly: DESCRIPTION: I learned this the hard way—dumping cold butter into sugar at once just makes a greasy mess. Use a hand mixer (or stand mixer) on medium speed for 2-3 minutes before adding wet ingredients. You’re aiming for a fluffy, pale yellow foam, not butter bits sinking to the bottom. This ensures even distribution of fat, which is non-negotiable for chewiness.
- Pack Brown Sugar Tight: DESCRIPTION: Light brown sugar is notorious for hiding air pockets. After measuring, press it firmly into the cup with a spoon or your palm—no shaking the bowl. Too much air means your cookies will spread unevenly and lose that signature dense center. Trust me, your cookies will thank you (and so will your taste buds).
- Chill Dough Twice: DESCRIPTION: Yes, even if you’re impatient like me. First, chill the dough for the full 24 hours (or at least 12). Then, before baking, pop the dough balls on a tray and refrigerate for another 15-20 minutes. This prevents excessive spreading and helps the butter stay firm—critical for that perfect chewy texture. Skip this, and you’ll end up with thin, crispy cookies.
- Use Room-Temp Eggs: DESCRIPTION: Cold eggs from the fridge will make your dough too stiff, leading to dense cookies. Let them sit in warm water for 5 minutes or on the counter for 20 minutes until they’re just warm to the touch. Room-temp eggs blend smoothly, distribute evenly, and help create that signature tender crumb. No, they don’t need to be hot—just not icy.
Creative variations of this dish
Brown Butter Magic
Swap the regular butter for browned butter to add a nutty, caramelized depth that takes these cookies to the next level. Brown 1 cup unsalted butter in a light-colored saucepan over medium heat, swirling occasionally until it turns golden brown and smells toasty—about 5-7 minutes.
Let it cool completely before mixing into your dough. The flavor transformation is worth the extra effort. 🌟
Salted Caramel Swirl
For a gourmet twist, replace half the chocolate chips with salted caramel bits or drizzle the baked cookies with homemade caramel sauce. I recommend Guittard salted caramel chips for convenience or homemade caramel made with 1 cup sugar, ½ cup heavy cream, and 2 tbsp butter.
Fold them into the dough or drizzle after baking for a sweet-salty surprise in every bite.
Spiced Variations
Add warmth with ½ teaspoon cinnamon (already in the recipe) plus ¼ teaspoon nutmeg or cardamom for a cozy spice profile. For a Mexican-inspired twist, swap cinnamon for ½ teaspoon chili powder and ¼ teaspoon cayenne pepper, then fold in ½ cup chopped pecans.
The heat balances the sweetness beautifully.
Gluten-Free Adaptation
Use a 1:1 gluten-free flour blend like King Arthur Measure for Measure and add ½ teaspoon xanthan gum to improve texture. Reduce the baking soda to ¼ teaspoon since gluten-free flours often contain their own leavening agents.
Chill the dough for 2 hours to prevent excessive spreading—these will be slightly denser but still chewy.
Double Chocolate Luxe
Boost the chocolate factor by adding ½ cup cocoa powder to the dry ingredients and using 2.5 cups chocolate chips (mix semi-sweet and dark for complexity). For extra richness, fold in ¼ cup chopped toasted walnuts or white chocolate chips for a marbled effect.
The result? A fudgy, decadent cookie that's perfect for dessert lovers. 🍫
Holiday Cookie Mix-Ins
Celebrate the season by adding festive mix-ins like ½ cup crushed peppermint candies or ¼ cup dried cranberries with ½ teaspoon orange zest. For a nutty crunch, toss ½ cup chopped candied pecans in 1 tbsp melted butter and 1 tbsp brown sugar before folding into the dough.
These variations keep the classic chewy texture while adding seasonal flair.
Nutrition facts
Frequently asked questions
Why do these cookies need to chill before baking?
Chilling the dough for at least 1 hour prevents excessive spreading and helps maintain that signature chewy texture. The cold butter solidifies, keeping cookies thicker with crisp edges and warm centers. Plus, flavors meld beautifully during chilling—don't skip this step!
Can I make these cookies without butter?
While butter creates the classic flavor, you can substitute with 1 cup vegetable shortening or 1 cup coconut oil (refrigerated until solid). For a lighter texture, use ½ cup butter + ½ cup shortening. Just note: butter gives the best flavor and chewiness—these alternatives won't be identical.
How do I prevent my cookies from spreading too much?
Use cold butter (not softened), chill the dough for at least 1 hour, and scoop portions with 2-tablespoon scoops. Place them 3 inches apart on the baking sheet. Also, make sure your oven is fully preheated to 350°F before baking. These steps work together to keep cookies thick and chewy.
What's the best way to store these cookies?
Keep baked cookies fresh for 5 days in an airtight container at room temperature. For longer storage, freeze them between parchment paper for up to 3 months. To reheat, wrap in foil and warm at 300°F for 5 minutes—they'll taste almost as good as fresh!
Can I use dark chocolate instead of semi-sweet chips?
Dark chocolate adds richness, but use 70% cacao or lower to avoid bitterness. For best results, chop your own chocolate bars to ensure even melting. Mix dark and semi-sweet chips for a complex flavor profile that keeps the classic chewy texture.