Desserts
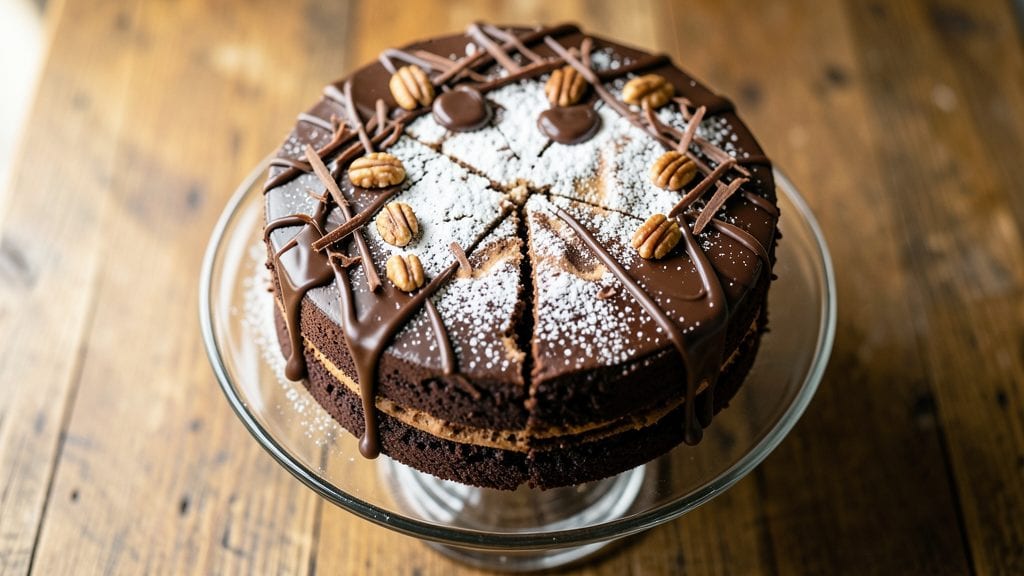
Betty Crocker's chocolate fudge cake recipe delivers that perfect balance of rich, moist layers and decadent fudgy centers we all crave. I've recreated this classic using precise techniques that ensure every slice lives up to the brand's reputation—no dry crumbs or overly sweet aftertaste here.
The secret lies in properly creaming the butter and sugar, then folding in the chocolate for maximum richness without overmixing.
This recipe builds on Betty Crocker's original by incorporating modern adaptations that make it foolproof for home bakers. We're talking about a 350°F bake time that guarantees perfectly set layers with fudgy centers, and a chocolate ganache filling that stays smooth even when sliced.
The frosting? A velvety chocolate buttercream that ties everything together beautifully. What makes this version special is how it maintains that classic Betty Crocker texture while being more forgiving with temperature variations.
By the time you're done, you'll have a cake that looks like it came straight from a bakery display case—rich, glossy layers separated by that signature fudgy filling.
The aroma alone will have everyone gathering around your kitchen, and each bite delivers that perfect contrast of tender cake and velvety chocolate. This is the kind of dessert that makes birthdays and holidays feel extra special without requiring advanced baking skills. Let's get baking!
The beauty of this recipe is its versatility. You can serve it as-is for a classic presentation, or add chocolate shavings and fresh berries for a more elegant touch. It also freezes beautifully, so you can make it ahead for special occasions.
The key to success is patience—letting the cake cool completely between layers and ensuring your filling is at the right temperature. Trust me, the effort pays off in every decadent bite.
Ingredients for betty crocker chocolate fudge cake
Classic Betty Crocker flavors with modern baking precision—just 14 ingredients for rich layers and fudgy perfection.
| Ingredient | Amount | Notes |
|---|---|---|
| Unsalted Butter 🧈 | 1 ½ cups | Room temperature, full-fat preferred |
| Granulated Sugar 🍚 | 2 ½ cups | White or light brown |
| Dark Brown Sugar 🍚 | 1 cup | Packed firmly |
| Large Eggs 🥚 | 4 whole | Room temperature |
| All-Purpose Flour 🌾 | 2 ½ cups | Sifted, spooned and leveled |
| Unsweetened Cocoa Powder 🍫 | ¾ cup | Natural or Dutch-processed |
| Baking Powder 🧂 | 2 tsp | Freshly opened |
| Salt 🧂 | ½ tsp | Fine sea salt |
| Milk 🥛 | 1 cup | Room temperature |
| Vanilla Extract 🍯 | 2 tsp | Pure alcohol-free preferred |
| Semisweet Chocolate Chips 🍫 | 1 ½ cups | High-quality, 60% cacao |
| Heavy Whipping Cream 🥛 | 1 cup | Full-fat for best results |
| Powdered Sugar 🍚 | 3 cups | Sifted for buttercream |
| Chocolate Ganache 🍫 | 1 ½ cups | Homemade or quality store-bought |
The butter and sugars are non-negotiable here. Crisco or shortening won't give that classic Betty Crocker tenderness, so grab the full-fat butter from the dairy aisle—none of that low-fat nonsense. For the best results, I always use Domino or Bob's Red Mill flour (they're consistent), and Hershey's Special Dark or Ghirardelli chocolate chips for that deep cocoa flavor. The cocoa powder? Hershey's or Dutch-processed works best—avoid the cheap stuff that looks like sawdust. Room-temperature eggs and milk are key too—no one wants to deal with lumps in their cake batter.
No vanilla extract? Vanilla bean paste at half the amount gives you those little specks of magic. Short on chocolate chips? Chop a 12-oz bar of chocolate (like Lindt or Ghirardelli) into chunks—it melts better than chips. For the ganache, store-bought from Ghirardelli is a lifesaver if you're short on time, but homemade (equal parts cream and chocolate) is worth the 5-minute wait. The buttercream needs full-fat cream—none of that light stuff. And if you're feeling fancy, swap half the powdered sugar for confectioners' sugar for a smoother frosting. Trust me, the difference is noticeable.
This cake keeps beautifully—3 days at room temperature covered, or 1 week refrigerated. For the ganache filling, let it set for 1 hour at room temp before assembling layers. The frosting? Make it 2 days ahead—it actually tastes better after the flavors meld. Freezes like a dream too: 2 months for the whole cake (wrap tightly in plastic), or 1 month for individual layers if you're prepping ahead for a party. Just bring it to room temp before serving.
Why You'll Love This Recipe
- Fewer Steps Needed: The recipe’s creaming method—just butter, sugars, and eggs—means no mixing bowls to scrub. I’ve made it while chatting with friends; the batter comes together faster than my coffee brews.
- Rich Without Fuss: That dark brown sugar? It’s the secret—deep, caramel undertones that cut through the cocoa’s bitterness. Honestly, it tastes like a bakery slice, but I’m the one who baked it.
- Birthday or Breakfast: One batch feeds a crowd or fuels my week. Serve it warm with ice cream for a party, or slice it cold for grab-and-go lunches. (Yes, even on a Tuesday.)
- Budget-Friendly Luxury: Five basic ingredients stretch to two cakes, and the butter-rich layers keep leftovers moist for days. My wallet thanks me, and so does my taste buds.
Step-by-step instructions for Betty Crocker chocolate fudge cake
Here's the classic method that delivers rich layers and fudgy centers every time.
Cream the Butter and Sugars Together
In a large mixing bowl, combine the 1.5 cups unsalted butter with the 2.5 cups granulated sugar and 1 cup dark brown sugar. Using an electric mixer on medium speed, beat for 3-5 minutes until the mixture is light and fluffy, nearly doubling in volume. You'll notice the color lighten slightly as air incorporates into the butter.
This step is crucial for creating the cake's tender crumb. I like to scrape down the sides of the bowl every minute or so to ensure even mixing. The butter should be at room temperature—if it feels too soft or melts, chill the bowl for 10 minutes before continuing. You'll know it's ready when the mixture leaves a clean ribbon when lifted with the beaters.
Add Eggs and Dry Ingredients Gradually
Add the 4 whole large eggs, one at a time, mixing well after each addition until fully incorporated. Then stir in the 2 teaspoons vanilla extract. The mixture will look slightly curdled at first, but that's normal—it will smooth out as we add the dry ingredients.
In a separate bowl, whisk together the 2.5 cups all-purpose flour, 0.75 cup unsweetened cocoa powder, 2 teaspoons baking powder, and 0.5 teaspoon salt. Gradually add this dry mixture to the wet ingredients, mixing on low speed just until combined. Avoid overmixing—stop as soon as the flour disappears. Then fold in the 1.5 cups semisweet chocolate chips by hand using a spatula.
Divide the Batter and Bake the Layers
Preheat your oven to 350°F. Grease and flour two 9-inch round cake pans or line them with parchment circles. Divide the batter evenly between the pans. Bake for 25-30 minutes, or until a toothpick inserted in the center comes out clean. The edges should be set but the tops still slightly springy to the touch.
I like to rotate the pans halfway through baking for even browning. Let the cakes cool in their pans for 10 minutes, then transfer to a wire rack to cool completely. This cooling step is important—it prevents the layers from becoming soggy when you assemble the cake. While the cakes cool, prepare the 1.5 cups chocolate ganache by melting it gently in a double boiler or microwave according to package instructions.
Assemble the Cake with Buttercream Filling
In a separate bowl, beat the 1 cup heavy whipping cream to stiff peaks. Then gradually add the 3 cups powdered sugar, mixing until smooth and fluffy. This will be your buttercream filling. Spread a layer of the ganache between the cooled cake layers, then add the buttercream mixture. Repeat with another layer of ganache and buttercream on top.
For the final touch, spread the remaining buttercream over the entire top of the cake and smooth with a spatula. Chill the cake in the refrigerator for at least 1 hour before slicing. This ensures clean layers and prevents the filling from melting. The cake will keep well in the fridge for up to 5 days, though I promise it won't last that long!
Pro Tips For Making Betty Crocker Chocolate Fudge Cake
- Cream Butter Slowly: After burning three batches of fudge cake, I learned to let the butter soften just to room temp—not warm—before creaming. Cold butter beats out greasy lumps, and the cake won’t turn out dense. (Yes, even if you’re impatient like me.)
- Measure Flour Right: The recipe calls for spoon-and-level—don’t scoop directly from the bag. Packed flour adds too much structure, and your cake will taste like cardboard. Use a kitchen scale if you’re serious, but at least dip the measuring cup in.
- Don’t Overmix Batter: Mix the dry ingredients just until combined—no streaks, but no aerated flour clouds either. Overworking the batter makes the cake tough. I used to beat it like I was kneading dough; now I stop the second the eggs disappear.
- Test for Doneness Early: The cake’s edges pull away from the pan before the center looks set. Insert a toothpick at the thickest spot—if it comes out with moist crumbs (not wet batter), pull it. Overbaking dries out the fudge flavor. (Your future self will thank you.)
Creative variations of this betty crocker chocolate fudge cake
Classic Red Velvet Twist
Swap out the cocoa powder for 2 tbsp red velvet cake mix (like Betty Crocker's) and 1 tbsp cocoa powder—this gives you that signature red hue and subtle cocoa flavor.
Use 1 cup buttermilk instead of milk for the batter, and add ½ tsp vinegar to the milk mixture for tang. The ganache filling stays chocolate, but the cake layers develop a beautiful red color.
I like to dust the top with powdered sugar before slicing for a pretty contrast. 💛
Espresso Chocolate Boost
For a sophisticated twist, add 1 tbsp instant espresso powder to the dry ingredients. This enhances the chocolate flavor without adding bitterness. I also swap half the milk for strong brewed coffee (about ½ cup) to deepen the chocolate notes.
The espresso pairs beautifully with the ganache filling, creating a mocha-like flavor profile. This variation is perfect for coffee lovers who want their cake to feel like dessert and coffee break combined.
Peanut Butter Fudge Fusion
Add ½ cup creamy peanut butter (like Jif) to the buttercream frosting for a peanut butter fudge cake hybrid. Fold it in after the powdered sugar stage, and add ¼ cup chopped peanuts to the top for crunch.
The peanut butter complements the chocolate perfectly, creating a rich, nutty contrast. For extra decadence, drizzle warm chocolate ganache over the top before the peanuts set. This version feels like a cross between a classic fudge cake and a peanut butter cup—trust me, it’s a crowd-pleaser.
Salted Caramel Layer
Replace the ganache filling with a homemade salted caramel sauce—simmer 1 cup heavy cream with 1 cup brown sugar until it thickens, then swirl in 2 tbsp butter and ½ tsp flaky sea salt. Let it cool slightly before spreading between the cake layers.
Top with a thin layer of chocolate buttercream, then sprinkle with flaky sea salt and chocolate shavings for a gourmet touch. The salty-sweet contrast elevates the cake to restaurant-quality without requiring advanced skills.
White Chocolate Swirl
Fold 1 cup white chocolate chips (like Guittard) into the batter after mixing in the dry ingredients. Then, use a spoon to create swirls in the batter before baking. The white chocolate melts slightly during baking, creating beautiful marbled patterns.
For the filling, mix ½ cup white chocolate ganache with the regular chocolate ganache to create a creamy, dual-toned filling. This variation adds a visual wow factor while keeping the classic fudge flavor intact.
Spiced Orange Zest
Brighten up the cake by adding 1 tbsp orange zest to the batter and 1 tsp orange extract to the buttercream. The citrus notes cut through the richness of the chocolate, creating a refreshing contrast. I also like to add ½ tsp cinnamon to the dry ingredients for warmth.
For garnish, top with thin orange slices and a dusting of powdered sugar. This variation is perfect for spring or summer gatherings when you want something lighter but still decadent.
Nutrition facts
Frequently asked questions
Can I make this cake in a different pan size?
Yes, but adjust baking times carefully. For 8-inch pans, bake 20-25 minutes and for 10-inch pans, bake 30-35 minutes. The key is a toothpick coming out clean. Always check 5 minutes early since ovens vary. Use the same batter quantity—just divide it proportionally between pans.
Why did my cake turn out dry?
Overmixing the batter or overbaking are the most common culprits. Mix just until combined (about 1 minute after flour disappears), and bake until a toothpick comes out with moist crumbs, not dry ones. For extra moisture, brush the cooled layers with simple syrup before adding filling.
Can I substitute the chocolate ganache?
Try homemade chocolate pudding (mix ½ cup milk with 3 tbsp cornstarch and ¼ cup sugar, then cook with 1 cup milk and 2 oz chocolate) or even Nutella spread for a quicker option. Just ensure your substitute is thick enough to hold between layers without leaking.
How do I store leftovers?
Cover tightly with plastic wrap and store at room temperature for 2 days, or refrigerate for up to 5 days. For longer storage, freeze individual layers wrapped in plastic for 2 months. Thaw overnight in the fridge before serving. The frosting may soften slightly when chilled—bring to room temp before slicing.
Can I make this cake gluten-free?
Yes, but use a 1:1 gluten-free flour blend (like Bob's Red Mill) and add ½ tsp xanthan gum to the dry ingredients. Reduce the milk by 2 tbsp since gluten-free flours absorb more liquid. Expect slightly denser layers—this is normal with GF baking. Test with a small batch first to adjust texture.