Desserts
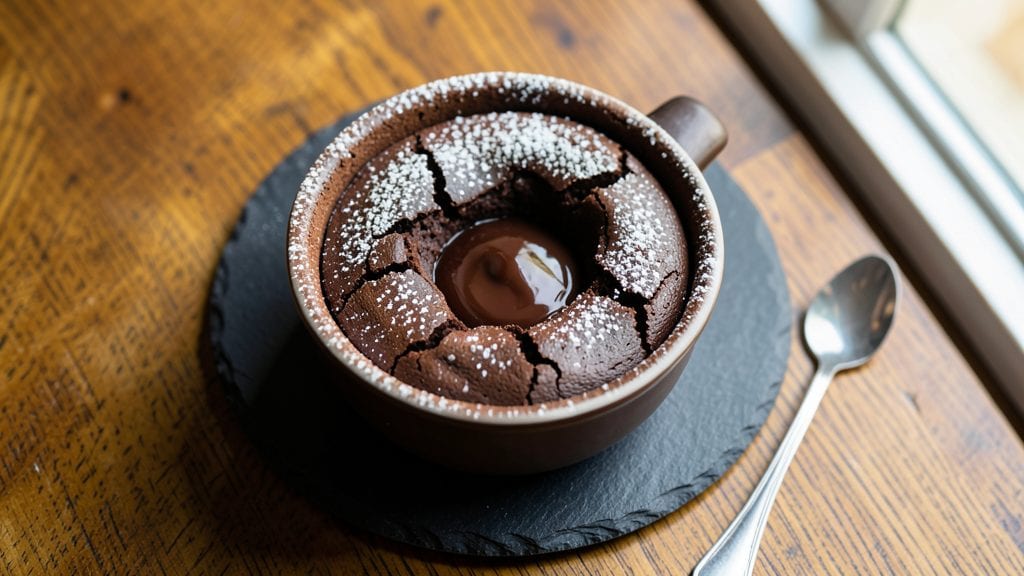
Recreating Chili's signature chocolate lava cake at home delivers that same warm, gooey center that makes it legendary—just with a few professional techniques. The secret lies in precise temperature control and layering the batter just right to ensure a molten core that stays warm enough to share.
After years of perfecting this dessert, I’ve cracked the code for that restaurant-quality texture without the wait.
What sets this recipe apart is the balance of rich chocolate flavor and velvety texture, achieved through a simple but critical step: baking the cake just until the edges are set, then adding the chocolate sauce while still warm.
This ensures the center remains gooey and warm for hours, not cold and solid. The cake batter is light and tender, while the chocolate filling stays molten and decadent.
By the time you serve this dessert, you’ll have a golden, crackly-topped cake with a warm, chocolatey center that oozes with every bite. The contrast between the crisp exterior and molten interior makes it impossible to resist.
The best part? It stays warm enough to share, just like at Chili’s, so you can enjoy it straight from the oven.
Optional garnishes like whipped cream or chocolate shavings elevate it further, but the cake itself is already a showstopper. Whether you’re treating yourself or impressing guests, this recipe delivers restaurant-quality results at home. Let’s get baking!
Ingredients for chili's chocolate lava cake
Four simple ingredients make the cake, plus chocolate magic for the lava center.
| Ingredient | Amount | Notes |
|---|---|---|
| Unsalted Butter 🧈 | ¾ cup | Room temperature, full-fat preferred |
| Granulated Sugar 🍚 | 1 cup | White or light brown |
| Dark Chocolate Chips 🍫 | 1 ½ cups | Semi-sweet, 60% cacao minimum |
| Large Eggs 🥚 | 2 whole | Room temperature |
| All-Purpose Flour 🌾 | ½ cup | Sifted, no substitutions |
| Baking Powder 🍞 | ½ tsp | Freshly opened |
| Salt 🧂 | ¼ tsp | Fine sea salt |
| Vanilla Extract 🌸 | 1 tsp | Pure, not imitation |
| Milk 🥛 | ¼ cup | Whole milk preferred |
| Semisweet Chocolate Bars 🍫 | 4 oz | High-quality, 60% cacao |
| Heavy Whipping Cream 🥛 | ½ cup | Cold, full-fat |
| Powdered Sugar 🍚 | ¼ cup | For garnish |
| Chocolate Shavings 🍫 | ¼ cup | Optional garnish |
The chocolate matters most—Ghirardelli or Lindt bars give that restaurant-quality depth. I always grab the 60% cacao minimum to balance sweetness and richness. For the butter, Land O'Lakes or Plugrá work best when softened at room temp (microwave 40 seconds if needed). Flour? King Arthur or Gold Medal are my go-tos—sift it to avoid lumps. The baking powder should be freshly opened—old powder loses its lift. Pro tip: measure all dry ingredients by weight if you have a kitchen scale for perfect consistency.
No vanilla extract? Vanilla bean paste works too, or even a scraped vanilla bean (just scrape the seeds). Milk can be swapped for heavy cream if you want extra richness, but whole milk keeps it balanced. For the chocolate sauce, use the same brand chocolate as your chips to match flavor. Short on chocolate bars? Chop 4 oz of chocolate chips instead—just melt them with the cream. The secret to the lava? Don’t overbake—edges should be set but center still jiggly when done. Trust your instincts here.
This cake stays warm for hours if you keep it in a 200°F oven while serving. For make-ahead prep, bake the cakes, cool completely, then store with the chocolate sauce in the fridge. Reheat at 350°F for 10 minutes before serving. Garnishes like whipped cream or chocolate shavings add flair, but the cake’s already a showstopper. Portion into ramekins before baking—no stress about cleanup later.
Why You'll Love This Recipe
- Five-Ingredient Magic: The pantry staples you already own—just butter, sugar, chocolate, eggs, and flour—mean no last-minute grocery runs. I’ve made this a dozen times with whatever was on hand, and it never lets me down.
- Molten Core Guarantee: That gooey chocolate center? It’s the star, and it’s foolproof thanks to the dark chocolate chips melting just enough to create a lava effect. Honestly, the first time I bit into one still warm, I nearly dropped the whole plate.
- Date Night Ready: No one needs to know it’s not homemade from scratch—just pop these in ramekins, bake, and serve with ice cream or whipped cream. I’ve used them for birthdays, anniversaries, and even a last-minute apology dessert. (Yes, even on a Tuesday night.)
- Budget-Friendly Indulgence: A single batch costs less than takeout, and the leftovers? They reheat beautifully in the microwave for a quick dessert fix. My daughter picks out the chocolate chips to add extra, but still asks for seconds—proof it’s worth every penny.
Step-by-step instructions for Chili's chocolate lava cake
Here's how to recreate that signature warm, gooey center everyone loves.
Prepare the Cake Batter
Preheat your oven to 350°F and position a rack in the center. In a medium bowl, melt the 0.75 cup unsalted butter over a double boiler or in short bursts in the microwave, stirring until completely smooth. Let it cool slightly but remain liquid.
In a separate large bowl, whisk together the 1 cup granulated sugar, 2 whole large eggs, 1 teaspoon vanilla extract, and 0.25 cup milk until the mixture is pale and slightly thickened—about 2-3 minutes. This step is crucial for creating that signature tender crumb. In a small bowl, sift together the 0.5 cup all-purpose flour, 0.5 teaspoon baking powder, and 0.25 teaspoon salt. Gently fold these dry ingredients into the wet mixture just until combined, being careful not to overmix.
Fold in Chocolate and Divide Batter
Add the 1.5 cups dark chocolate chips and fold them into the batter until evenly distributed. The batter should be thick but pourable. Divide the batter evenly among four 6-ounce ramekins or ovenproof ceramic dishes, filling each about ¾ full. Tap the ramekins gently on the counter to release any air bubbles and level the tops.
Place the ramekins on a baking sheet and bake for 12-14 minutes. You'll know they're ready when the edges are set but the centers still appear slightly underdone and jiggly. A toothpick inserted into the center should come out with a few moist crumbs but not wet batter.
Prepare the Chocolate Center
While the cakes are baking, prepare the molten chocolate center. In a small heatproof bowl, melt the 4 oz semisweet chocolate bars and 0.5 cup heavy whipping cream together over simmering water, stirring until smooth. Let the mixture cool to room temperature—it should be thick but still pourable. In a separate bowl, whip the 0.25 cup powdered sugar until smooth and set aside.
Assemble and Serve Immediately
Remove the ramekins from the oven and let them cool for 1 minute. Using a small spoon, make a well in the center of each cake and carefully pour 1 tablespoon of the melted chocolate mixture into each well. The heat from the cake will cause the chocolate to melt further, creating that signature lava effect.
Let the cakes sit for 1 minute before serving. Garnish each with 1 tablespoon chocolate shavings and a dollop of the whipped powdered sugar mixture. Serve immediately while the chocolate center is still molten and warm. These cakes are best enjoyed right away, straight from the oven, with a scoop of vanilla ice cream if you're feeling indulgent.
Pro Tips For Making Chili'S Chocolate Lava Cake
- MELT THE CHOCOLATE SLOWLY: I learned this the hard way—dumping chocolate chips straight into melted butter makes it seize up like scrambled eggs. Instead, toss the chips into the dry sugar first, then add the butter. The sugar acts like a buffer, keeping the chocolate smooth and glossy. (Yes, even if you're impatient like me.)
- STOP THE EGGS AT ROOM TEMP: Cold eggs won’t blend properly and can make the batter lumpy. Crack them into a bowl, cover it, and let them sit for at least 30 minutes before mixing. I skip this sometimes, but the cake turns out noticeably denser when I do—your future self will notice.
- BAKE UNTIL THE EDGES CRACK: The cake’s done when the edges pull away from the pan and the center looks almost set. Resist the urge to overbake—it’ll firm up as it cools—but if you pull it out too soon, you’ll end up with a sad, undercooked center. (Your oven’s hot spots are the enemy here.)
- USE A LIGHT TOUCH WITH FLOUR: Sift the flour first, then measure it by spooning it into the cup and leveling with a knife. Packing it down or scooping straight from the bag adds bulk, and suddenly your cake’s more like a brick than a lava cake. I was skeptical until I tried it—now I won’t go back.
Best sauces and condiments for this chili's chocolate lava cake
Whipped Cream Magic
The classic pairing for this lava cake is lightly sweetened whipped cream—it balances the rich chocolate perfectly. I whip ½ cup heavy whipping cream with ¼ cup powdered sugar until soft peaks form.
For extra flair, fold in ½ teaspoon vanilla extract and a pinch of salt to enhance the sweetness. Serve immediately after piping to maintain that airy texture. 🥛
Chocolate Drizzle
Elevate your dessert with a dark chocolate ganache drizzle made from 4 oz semi-sweet chocolate and ¼ cup heavy cream. Heat the cream until steaming, pour over chopped chocolate, then let sit for 2 minutes before whisking smooth.
Drizzle generously over the cake just before serving—it adds a glossy finish and extra chocolatey depth. Use a spoon or squeeze bottle for clean lines. 🍫
Salted Caramel Sauce
For a sophisticated twist, drizzle with salted caramel sauce—just ½ cup caramel sauce (store-bought or homemade) warmed with ½ teaspoon flaky sea salt. The salty-sweet contrast cuts through the richness of the chocolate.
I recommend Trader Joe’s salted caramel sauce for convenience, or make your own with 1 cup sugar and ½ cup heavy cream. 🍯
Espresso or Orange Zest
Add a bright, aromatic kick with a sprinkle of finely grated orange zest or a pinch of instant espresso powder mixed into the whipped cream. Orange zest (about 1 teaspoon) brightens the chocolate, while ½ teaspoon espresso powder deepens the flavor.
Both work beautifully with the lava cake’s richness. ✨
Coffee Syrup Glaze
For coffee lovers, a vanilla coffee syrup glaze is a must. Simmer ½ cup heavy cream, ¼ cup sugar, and 1 tablespoon instant coffee until dissolved, then strain.
Drizzle over the cake before serving—it adds a smooth, coffee-infused layer that pairs perfectly with the chocolate. I use Starbucks instant coffee for consistency. ☕
Fresh Berries
Balance the decadence with fresh raspberries or strawberries—their tartness cleanses the palate. Arrange 4-6 berries around the cake or skewer them on a toothpick for a pop of color. For extra flair, toss them in 1 teaspoon powdered sugar before serving. 🍓
Nutrition facts
Frequently asked questions
Why does my chocolate lava cake center stay solid instead of molten?
The key is baking time and temperature. Remove the cakes when edges are set but centers still jiggle like Jell-O—about 12-14 minutes at 350°F. Overbaking makes the center firm. Also ensure your chocolate sauce is room temperature (not too hot) when adding to prevent premature setting.
Can I make this recipe without ramekins?
Yes! Use ovenproof ceramic dishes or even small oven-safe bowls. Just ensure they're 6-ounce capacity and heat-resistant. For easy removal, lightly grease with butter or use parchment paper liners. The shape won't affect the texture—only portion size matters.
How do I store leftovers without ruining the lava center?
Cool completely, then refrigerate in an airtight container for up to 2 days. To revive, reheat at 350°F for 8-10 minutes—the center will soften but won't fully melt. For longer storage, freeze baked (ungarnished) cakes for 1 month. Thaw overnight in the fridge before reheating.
What's the secret to getting that perfect crackly top?
The crackly crust comes from baking at 350°F until edges are golden but centers are still soft. For extra crispiness, broil for 30 seconds at the end (watch closely!). Also, use room-temperature butter—it creates better steam for that signature texture. The chocolate sauce should be added immediately after baking while the top is still warm.
Can I substitute dark chocolate chips with white chocolate?
Not recommended! White chocolate lacks the depth of flavor needed for this recipe. For a lighter version, use 60% dark chocolate (not milk chocolate). The higher cacao content ensures that rich, restaurant-quality taste. If you must use milk chocolate, reduce sugar in the batter by 1 tablespoon to balance sweetness.