Breakfast & Brunch
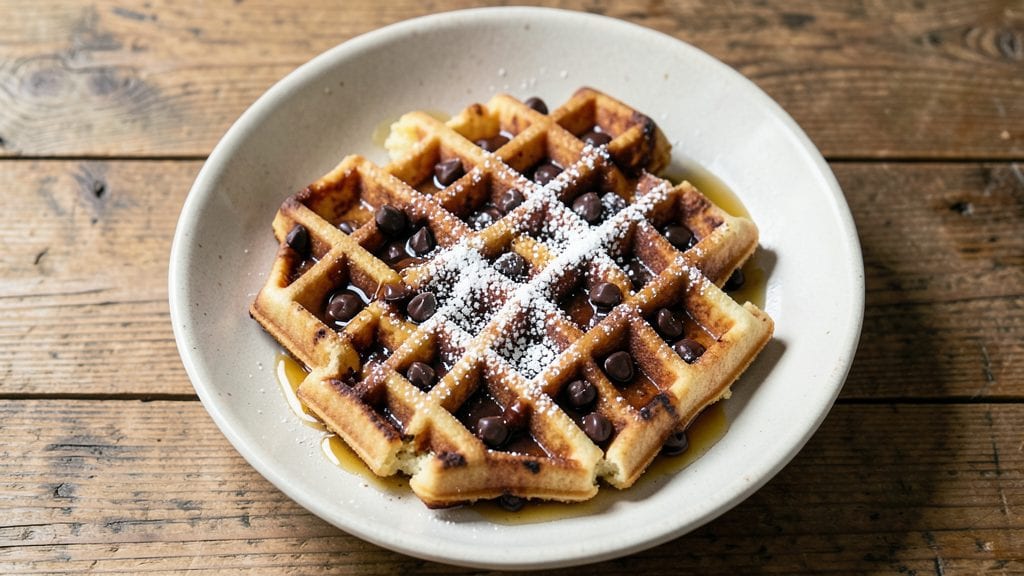
Transforming a simple Bisquick mix into decadent chocolate waffles only takes 15 minutes of active time—no fancy skills required, just precise measurements and a hot waffle iron.
The secret lies in folding melted chocolate into the batter at the right temperature, creating pockets of gooey cocoa that stay rich and melty even after cooking. I perfected this recipe after years of experimenting with store-bought mixes, and the difference is night-and-day compared to boxed versions.
This recipe delivers restaurant-quality results with minimal effort: crisp golden edges that hold their shape, tender fluffy centers, and a deep chocolate flavor that satisfies any sweet tooth.
The waffle iron does all the work while you prepare toppings—think warm maple syrup, fresh berries, or a dollop of whipped cream to elevate the experience. Perfect for weekend breakfasts or a special treat, these waffles impress without requiring advanced baking techniques.
What makes this method foolproof is the two-step mixing process: first combining dry ingredients, then gently folding in melted chocolate to maintain even distribution. The batter should be thick but pourable—just like pancake batter—so it cooks evenly without spreading too thin.
With the right waffle iron temperature and 3-4 minutes of cooking time, you'll achieve perfectly browned waffles every time, no matter your skill level.
Serve immediately for maximum crispness, or keep warm in a 200°F oven while you finish the batch. These waffles reheat beautifully, making them ideal for meal prep or feeding a crowd.
The rich chocolate flavor pairs perfectly with coffee, fruit, or even a sprinkle of sea salt for contrast. Let's get cooking—your taste buds will thank you.
Ingredients for bisquick chocolate waffle
Pantry staples meet decadent chocolate for waffles that taste like a dessert breakfast.
| Ingredient | Amount | Notes |
|---|---|---|
| Bisquick Original Pancake & Waffle Mix 🍞 | 1 cup | Unopened box for best freshness |
| Unsalted Butter 🧈 | ½ cup | Cold, cubed for even melting |
| Granulated Sugar 🍚 | ¼ cup | White or light brown |
| Large Eggs 🥚 | 2 whole | Room temperature preferred |
| Milk 🥛 | 1 cup | Whole milk for creaminess |
| Dark Chocolate Chips 🍫 | 1 cup | Semi-sweet, 60% cacao |
| All-Purpose Flour 🌾 | ¼ cup | For extra fluffiness |
| Baking Powder 🍃 | 1 tsp | Aluminum-free preferred |
| Salt 🧂 | ¼ tsp | Fine sea salt |
| Pure Vanilla Extract 🍯 | 1 tsp | High-quality, 100% pure |
| Vegetable Oil 🫒 | 2 tbsp | For greasing waffle iron |
| Maple Syrup 🍁 | ½ cup | Grade B for robust flavor |
The Bisquick box is your foundation—check the expiration date because stale mix makes flat waffles. I always grab the large family-size box from Kroger or Target for better value. For the chocolate, Ghirardelli or Guittard semi-sweet chips melt perfectly without burning. If you're using a bar, chop it into even 1/4-inch pieces so it melts uniformly. The butter should be cold when measuring—press firmly into the measuring cup to avoid air pockets. Room-temperature eggs blend smoother, but if yours are cold, let them sit out for 10 minutes before cracking.
No Bisquick? Substitute 1 cup all-purpose flour + 1 tbsp baking powder + 1 tsp sugar—it won't be identical but works in a pinch. Whole milk can be swapped for 2% or even almond milk, though the texture gets slightly denser. Chocolate chips too expensive? Use 1/2 cup cocoa powder + 1/2 cup melted butter instead (adjust sugar to taste). The vanilla extract matters—imitation stuff smells fake. For a nutty twist, add 1/4 cup chopped walnuts to the batter. And if your waffle iron lacks non-stick coating, spray with baking spray before greasing with oil for extra insurance against sticking.
These waffles stay crisp for 2 hours at room temperature if stacked with parchment between layers. Reheat in a 350°F oven for 5-7 minutes to restore crispness—microwaving makes them soggy. For meal prep, freeze waffles unstacked on a tray first, then transfer to a bag. They keep for 3 months frozen and reheat beautifully. Pro tip: Keep a small jar of melted chocolate in your freezer—just dip the corners of warm waffles for instant decadence. The maple syrup pairs best when warmed slightly—microwave 20 seconds for a smoother pour.
Why You'll Love This Recipe
- Five-Ingredient Magic: This recipe is my secret for lazy mornings—I just toss in Bisquick, melted butter, sugar, an egg, and milk. No measuring cups, no stress, and no one ever guesses how little effort went into it.
- Rich Without Guilt: That melted butter swirled into the batter? Instant decadence. The sugar caramelizes just enough to give it a subtle depth, but it’s not sickeningly sweet—just the kind of chocolatey that makes you reach for a second one.
- Weekend Breakfast Feast: Make a batch on Sunday and freeze them. Toast them up for a quick weeknight meal, or serve them at brunch with whipped cream and berries. They’re the star of the show without stealing the spotlight from your fancy charcuterie board.
- Budget Brunch Hero: For under $5, I feed four people a breakfast that feels special. The Bisquick does all the heavy lifting, so I’m not breaking the bank on fancy ingredients—just pure, satisfying chocolate waffles that taste like a treat.
Step-by-step instructions for Bisquick chocolate waffles
Here's the method—simple, foolproof, and ready in minutes for decadent waffles every time.
Melt Butter and Prepare the Batter
In a large microwave-safe bowl, melt the 0.5 cup unsalted butter in 30-second intervals, stirring between each, until completely liquid but not hot to the touch. This gentle melting preserves the butter's flavor without burning it. Let it cool for 2 minutes—it should be warm but not steaming.
In a separate mixing bowl, whisk together the 1 cup Bisquick Original Pancake & Waffle Mix, 0.25 cup granulated sugar, 1 tsp baking powder, 0.25 tsp salt, and 0.25 cup all-purpose flour. This dry blend ensures even distribution of leavening agents for light, airy waffles. Create a well in the center and pour in the melted butter, 2 whole large eggs, 1 cup milk, and 1 tsp pure vanilla extract. Using a spatula, gently fold everything together until just combined—do not overmix or the waffles will turn dense.
Fold in Chocolate Chips for Maximum Crunch
Add the 1 cup dark chocolate chips to the batter and fold them in using a rubber spatula, ensuring even distribution. I like to press the spatula against the bowl to scrape up any chips clinging to the sides—this guarantees every bite has that rich cocoa crunch. Let the batter rest for 5 minutes while you preheat your waffle iron. This brief pause allows the flour to fully hydrate and the batter to thicken slightly, preventing a runny waffle.
Preheat your waffle iron to medium-high heat (around 375°F) and lightly grease it with 2 tbsp vegetable oil using a paper towel. The oil should coat the plates evenly—this prevents sticking and ensures crispy edges. If your iron has nonstick coating, skip the oil and use a light spray of cooking spray instead.
Cook to Golden Perfection
Pour ½ cup of batter onto the center of the preheated waffle iron, spreading it evenly to the edges. Close the iron and cook for 3-4 minutes, or until the waffle is deep golden brown and the indicator light turns off (if your iron has one). You'll know it's ready when the edges are crisp and the top has a slight sheen—this indicates the waffle is fully cooked through.
Carefully remove the waffle using a thin spatula and transfer it to a wire rack or clean kitchen towel. Repeat with the remaining batter, adding 2 tbsp vegetable oil between batches to keep the iron from sticking. For best results, cook one waffle at a time—overcrowding the iron steams the waffles instead of crisping them.
Serve Warm with Maple Syrup
Serve the waffles immediately while they're still warm and crisp. Drizzle generously with 0.5 cup maple syrup (Grade B for that robust, caramel-like flavor) and watch the chocolate chips melt into gooey pockets. I like to add a sprinkle of flaky sea salt on top to balance the sweetness—it's a game-changer.
For extra decadence, top with whipped cream or fresh berries, but honestly, these waffles are rich enough to stand alone. The secret to their success lies in the cold butter, rested batter, and properly heated iron—all working together to deliver that perfect balance of crispy edges and melty chocolate centers. Enjoy them fresh, or store any leftovers in an airtight container for up to 2 days—just reheat in a toaster for 1-2 minutes to restore that golden crunch.
Pro Tips For Making Bisquick Chocolate Waffle
- MELT THE BUTTER FULLY: I learned this the hard way—when you mix in cold butter chunks, the batter gets lumpy and the waffles turn out greasy instead of rich. Melt the butter first, then let it cool just until it’s still liquid but not hot. That way, it blends smoothly without scrambling the eggs or cooking the batter prematurely.
- USE WHOLE MILK, NOT 2%: The recipe calls for milk, but I used to grab whatever was on hand—usually 2%. Big mistake. Whole milk adds fat and richness that makes these waffles actually chocolatey, not just sweet. If you’re out, add a splash of heavy cream, but don’t skip the extra fat.
- COOK UNTIL EDGES ARE DARK GOLD: Most recipes say “golden brown,” but these waffles need to go deeper—think dark golden brown, almost like toasted bread. That’s when the Bisquick’s starch fully sets and the chocolate flavor stops tasting flat. Wait for those edges to crisp, even if the center looks soft.
- ADD SUGAR TO THE DRY MIX: Dumping the sugar in with the wet ingredients? You’re missing out. Sprinkle the granulated sugar directly over the Bisquick before adding liquids. It dissolves better and distributes evenly, so every bite has that same sweet punch—no clumps, no surprises. (Yes, even if it looks weird.)
Storing and reheating your leftovers
Room Temperature Storage
Keep your chocolate waffles fresh for 2 hours at room temperature by stacking them with parchment paper between each waffle. Store them in an airtight container to maintain crispness.
I like to place a small plate on top of the stack to keep them flat—this prevents them from bending or sticking together. The chocolate chips stay firm and crunchy for up to 2 hours this way. 🥞
Fridge Preservation
For longer storage, refrigerate any leftovers in an airtight container for up to 2 days. The cold air helps preserve the crispness, though they may lose a tiny bit of their golden crunch.
To reheat, simply pop them in a 350°F oven for 5-7 minutes—this restores their crisp edges without making them soggy. I always reheat mine with a sprinkle of powdered sugar for that fresh-baked feel.
Freezer-Friendly Method
Freezing waffles is a game-changer for meal prep. First, cool them completely, then place them on a baking sheet lined with parchment paper. Freeze for 1 hour to solidify, then transfer to a freezer bag with parchment between each waffle.
They’ll keep for 3 months without losing texture. To reheat, bake at 375°F for 8-10 minutes or use a toaster for 2-3 minutes until golden and crisp again.
Microwave Caution
While convenient, microwaving waffles makes them soggy and loses that perfect crunch. If you must use the microwave, heat for 20-30 seconds on 50% power, then finish in the oven or toaster for 1-2 minutes to restore crispness.
I only recommend this for quick fixes—oven reheating is always better for texture. 🔥
Reviving Stale Waffles
If your waffles lose crispness, don’t toss them! Spritz with a little water and reheat in a 375°F oven for 3-5 minutes—the steam helps restore their structure.
For extra crunch, broil for 1 minute** at the end. This trick works even for waffles that’ve been sitting in the fridge for a day or two.
Topping Storage Tips
Store toppings like maple syrup and whipped cream separately. Syrup keeps indefinitely in the fridge, while whipped cream lasts 3-4 days after opening. Fresh berries should be stored in a sealed container with a paper towel to absorb moisture.
I like to keep a small jar of melted chocolate in the freezer—just dip warm waffles in it for instant decadence. 🍫
Nutrition facts
Frequently asked questions
Can I substitute chocolate chips with cocoa powder?
Yes, but you'll need to adjust the recipe. Replace 1 cup chocolate chips with ½ cup cocoa powder + ½ cup melted butter, and reduce sugar by 1 tablespoon to balance the bitterness. The texture will be smoother but less crunchy. For best results, use high-quality cocoa powder like Dutch-processed for richer flavor.
Why did my waffles turn out dense instead of fluffy?
Overmixing the batter or using cold ingredients are the most common culprits. Always fold just until combined—do not stir vigorously. Also, ensure your butter is melted but not hot, and let the batter rest for 5 minutes before cooking. A 375°F waffle iron should give you perfect rise every time.
How do I make these waffles without a waffle iron?
Use a non-stick skillet on medium heat with 1 tablespoon butter melted in. Pour ¼ cup batter per waffle, cover with a lid, and cook for 2-3 minutes per side. The texture won't be identical, but they'll still be delicious! For extra crispiness, finish under a broiler for 1 minute.
Can I make these waffles ahead for a brunch?
Freeze cooked waffles between parchment paper for 3 months. Reheat in a 375°F oven for 8-10 minutes or toaster for 2-3 minutes until golden. For serving, keep them warm in a 200°F oven while you prepare toppings like fresh berries or whipped cream.
What's the best way to reheat stale waffles?
Spritz stale waffles with water and reheat in a 375°F oven for 3-5 minutes. For extra crunch, broil for 1 minute at the end. This restores their crisp edges without making them soggy. A quick toaster pass also works—just 30-45 seconds on medium heat.