Desserts
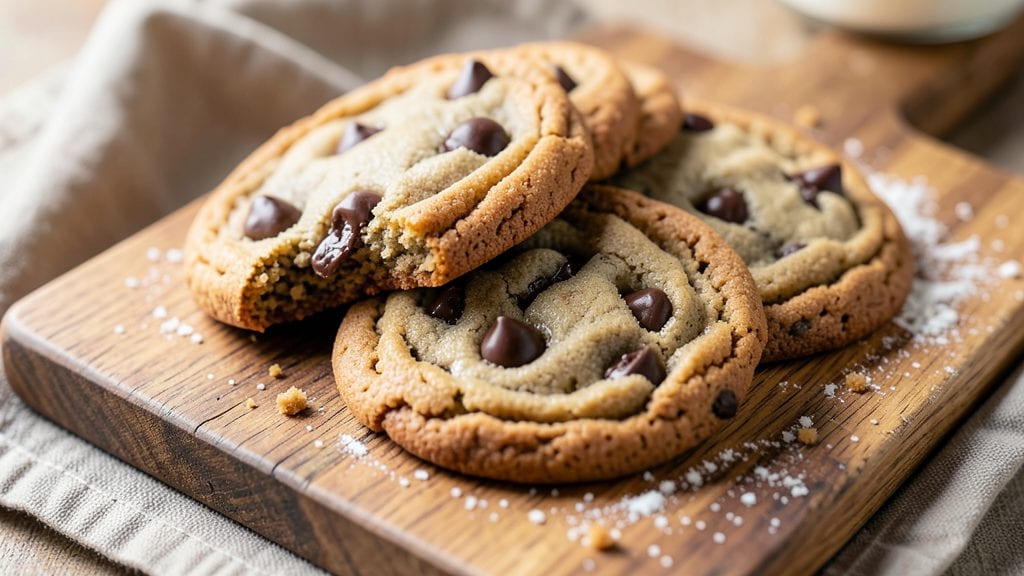
The Betty Crocker chewy chocolate chip cookie recipe delivers that perfect balance of crisp browned edges and gooey centers we all crave. ✨ After years of baking experiments, I’ve refined this classic into a foolproof method that stays true to the original while adding a few professional touches for even better results.
The secret lies in the butter-to-flour ratio and precise baking time—no guesswork, just guaranteed golden-brown perfection.
This recipe uses simple pantry staples but transforms them into cookies that taste like they came straight from a bakery. The dough gets chilled before baking, which prevents excessive spreading and ensures those signature chewy centers.
Brown sugar adds moisture and chewiness, while melted butter creates the tender texture that makes these cookies irresistible. You’ll need just 15 minutes of prep time and 12-14 minutes in the oven—easy enough for weeknights but impressive enough for company.
What you’ll end up with are cookies that are crisp at the edges, soft in the middle, and loaded with melty chocolate chips that stay gooey even after cooling.
The aroma alone will have everyone gathering in the kitchen, and the first bite delivers that perfect combination of sweet, buttery, and rich chocolate flavor. These are the kind of cookies that disappear faster than you can say "double batch."
Perfect for holiday gatherings, bake sales, or satisfying that afternoon sweet tooth, this recipe scales beautifully. Whether you’re a beginner or a seasoned baker, these chewy chocolate chip cookies will become your new go-to. Let’s get baking—your kitchen (and taste buds) will thank you.
Ingredients for betty crocker chewy chocolate chip cookie
Simple pantry staples transform into bakery-style cookies with crisp edges and melty centers.
| Ingredient | Amount | Notes |
|---|---|---|
| Unsalted Butter 🧈 | 1 cup | Melted, full-fat for richness |
| Granulated Sugar 🍚 | ¾ cup | Standard white sugar |
| Packed Brown Sugar 🍚 | ¾ cup | Light or dark, packed tight |
| All-Purpose Flour 🌾 | 2 ½ cups | Sifted, spooned and leveled |
| Baking Soda 🧂 | 1 tsp | Fresh for best rise |
| Salt 🧂 | 1 tsp | Fine sea salt preferred |
| Vanilla Extract 🍯 | 2 tsp | Pure, not imitation |
| Semisweet Chocolate Chips 🍫 | 2 cups | Nestlé or Ghirardelli preferred |
| Large Eggs 🥚 | 2 whole | Room temperature |
| Vanilla Bean Seeds (optional) 🍯 | ¼ tsp | Scraped from 1 pod |
The butter is non-negotiable—use full-fat, unsalted for maximum flavor and texture. Land O'Lakes or Plugrá are my go-tos, but any good brand works. Melt it gently in the microwave (40-second bursts) to avoid burning. Brown sugar is your chewiness secret—pack it tightly into the cup. Domino or Gold Medal flour works perfectly, but if you're at Whole Foods, grab their organic white flour for a lighter texture. The vanilla extract? Go for pure, not imitation—it makes a difference, trust me. For chocolate chips, Nestlé or Ghirardelli that some budget brands do.
No vanilla bean? Pure extract is fine—just don't cut corners with imitation. Short on chocolate chips? Chop a bar of chocolate into chunks (70% dark or semisweet). Eggs must be room temp—pop them out of the fridge 30 minutes before mixing. The baking soda is freshness critical—if it's old, your cookies might not rise right. For a nutty twist, swap half the chocolate chips for chopped walnuts or pecans. And if you're feeling fancy, add a pinch of flaky sea salt on top before baking for a gourmet touch.
This dough chills beautifully—wrap it tightly in plastic and refrigerate for up to 48 hours. Scoop with a cookie scoop or ice cream scoop for uniform size. Bake at 375°F for 12-14 minutes—edges should be golden but centers still soft. Store in an airtight container at room temp for 5 days, or freeze the dough balls for 3 months. Pro tip: Let cookies cool 5 minutes before transferring to avoid squishing them.
Why You'll Love This Recipe
- No-Fuss Mixing: I swear by the creamy butter-sugar combo—just cream, then fold in dry ingredients. No food processor, no stress, and the dough comes together like a dream. (Yes, even when my hands are still sticky from the kids’ art projects.)
- Chewy Magic: That perfect balance of crisp edges and soft centers? It’s all in the brown sugar-to-white sugar ratio and the baking soda lift. Honestly, the first bite makes me forget I’m making cookies—until I realize I just ate half the batch.
- Party-Ready Staple: Freeze half the dough balls for last-minute gatherings, and no one will guess they’re prepped ahead. (Between us, I’ve pulled this off for book clubs, potlucks, and even my mom’s birthday—she still thinks I’m a baking genius.)
- Budget-Friendly Bites: Butter and sugar stretch far here, and you’re left with cookies that cost pennies per serving. I’ll be real: my grocery budget stays happy, and so does my cookie jar—always stocked, always disappearing.
Step-by-step instructions for Betty Crocker chewy chocolate chip cookies
Get ready for cookies with that perfect chewy texture and melty chocolate—this method delivers every time!
🍳 Step 1: Melt the Butter and Mix Sugars
In a large mixing bowl, melt the 1 cup unsalted butter over low heat or in the microwave (30-second intervals, stirring between each). Let it cool slightly—it should be warm to the touch but not hot. Add the 0.75 cup granulated sugar and 0.75 cup packed brown sugar, then whisk until smooth and fully combined.
Here's the thing—don't skip letting the butter cool. If it's too hot when you add the eggs, you'll end up with scrambled eggs instead of silky dough. The sugars will help temper the butter temperature as you mix.
👨🍳 Step 2: Add Eggs and Vanilla for Rich Flavor
Crack the 2 whole large eggs directly into the butter-sugar mixture (no shells!). Add the 2 teaspoons vanilla extract and the 0.25 teaspoon vanilla bean seeds (if using). Whisk vigorously for 1-2 minutes until the mixture lightens in color and becomes thick and creamy. You'll see it nearly double in volume—this is how you get that classic chewy texture.
I always use room-temperature eggs for better emulsification. If they're cold, they won't blend as smoothly, and you might end up with streaks in your dough. The vanilla bean seeds add an extra layer of depth that makes these cookies truly special.
👨🍳 Step 3: Combine Dry Ingredients
In a separate bowl, whisk together the 2.5 cups all-purpose flour, 1 teaspoon baking soda, and 1 teaspoon salt. Sift the flour mixture directly into the butter mixture while mixing on low speed. This prevents gluten development and keeps your cookies tender. Once combined, fold in the 2 cups semisweet chocolate chips using a spatula—make sure they're evenly distributed throughout the dough.
Don't overmix here. When you pull the spatula out, you should still see some flour streaks. Overmixing develops gluten, which leads to tough cookies. The chocolate chips should be evenly scattered—some in the center, some near the edges—so every bite has that melty surprise.
⏰ Step 4: Chill the Dough for Perfect Texture
Cover the dough bowl with plastic wrap and refrigerate for at least 1 hour (or up to 24 hours). This chilling step is non-negotiable—it prevents excessive spreading in the oven and intensifies the flavors. The dough will firm up nicely, making it easier to scoop and handle.
I know it seems counterintuitive to wait, but trust me. Cold dough means thicker cookies with crisp edges and gooey centers. If you're short on time, at least chill it for 30 minutes in the freezer—it still makes a difference.
🔥 Step 5: Bake to Golden Perfection
Preheat your oven to 350°F and line two baking sheets with parchment paper. Scoop the chilled dough into 2-tablespoon portions (about 1.5 inches in diameter) and place them 3 inches apart on the prepared sheets. Flatten each mound slightly with your palm.
Bake for 11-13 minutes until the edges are golden brown but the centers still look slightly underdone. They'll continue cooking on the hot pan after you remove them. Let them cool on the baking sheet for 5 minutes before transferring to a wire rack. The centers should be soft and slightly underbaked—that's where the magic happens!
Pro Tips For Making Betty Crocker Chewy Chocolate Chip Cookie
- Use Cold Butter Cubes: I learned this the hard way—softened butter makes cookies spread too much. Cut the unsalted butter into ½-inch cubes and keep them in the fridge until you’re ready to mix. The dough stays cooler, and your cookies hold their shape better.
- Pack That Brown Sugar: Don’t scoop it straight from the bag—pack the brown sugar firmly into the measuring cup. After leveling, tap the cup sharply on the counter 3-4 times to settle it. Too little packed sugar means less chew, and nobody wants a dry cookie.
- Skip the Overmixing: Mix the dough just until the flour disappears—about 10-12 strokes with a wooden spoon. Overmixing develops gluten, and chewy cookies turn tough. If the dough looks shaggy, stop. The texture will smooth out when chilled.
- Chill the Dough Longer: Betty Crocker’s recipe says 24 hours, but I’ve found 36-48 hours makes a real difference. The flavors meld, and the cookies stay soft longer. Divide the dough into balls, flatten slightly, and store in the fridge. (Yes, even if you’re impatient like me.)
Troubleshooting this dish
Butter Too Soft?
If your melted butter is too runny when you mix it with sugars, let it cool for 5-10 minutes before adding eggs. Butter that's too hot can cause cookies to spread excessively or develop a cakey texture.
I've learned the hard way—once, I rushed and ended up with flat, greasy cookies instead of the chewy ones we want. For extra control, chill the butter in the fridge for 10 minutes after melting. 🧈
Cookies Spread Too Much
This usually means your dough wasn't chilled long enough or your oven runs hot. First, ensure you're chilling the dough for at least 1 hour (overnight is best). Use a cookie scoop> to portion dough balls—this creates uniform size.
If you notice spreading during baking, rotate your pans halfway through the 12-14 minute bake time. A light cornstarch dusting> on the baking sheet also helps prevent sticking and excessive spreading.
Dry or Cakey Texture
Overmixing the dough or using too much flour are the most common culprits. When combining dry ingredients, stop mixing as soon as the flour disappears—you should still see small flour streaks. For extra moisture, add 1 tablespoon milk> to the dough if it feels too dry.
I've found that using cold butter> (chilled before melting) also prevents dryness. If your cookies still turn out cakey, try reducing flour by 1-2 tablespoons> next time.
Chocolate Chips Not Melty
This happens when cookies cool too quickly or chips aren't high-quality. Use Nestlé or Ghirardelli chocolate chips>—they're designed to melt perfectly. Let cookies cool on the baking sheet for exactly 5 minutes> before transferring to a rack.
For extra gooeyness, press a few extra chips on top right after baking. If you're still having issues, try swapping half the chips for chopped chocolate bars> (they melt better than chips).
Uneven Baking
Hot spots in your oven can cause some cookies to bake faster than others. Rotate pans halfway through baking and use the middle rack for even heat distribution.
If your oven has hot spots, try baking on the lower rack first for 5 minutes, then move to the middle rack to finish. I've also had success using two cooling racks> on my baking sheets—this allows air to circulate better underneath.
Cookies Too Hard
This usually means they were baked too long or cooled too quickly. Pull cookies from the oven when edges are just golden—centers should still look slightly underdone. Let them rest on the baking sheet for 5 minutes> before transferring.
For extra tenderness, store cookies in an airtight container with a slice of bread to absorb excess moisture. If you've already baked them too hard, try reheating in the oven at 300°F> for 2-3 minutes**> with a pat of butter on top.
Nutrition facts
Frequently asked questions
Why does this recipe use melted butter instead of creamed butter?
Melted butter creates a denser, chewier texture that's classic for Betty Crocker-style cookies. When creamed with sugar, butter develops tiny air pockets that make cookies cakey. The melted butter here combines with sugars to form a smooth base that yields that signature thick, chewy center we all love. Plus, it's easier to mix and requires less effort!
Can I make these cookies without eggs?
Yes! Replace the 2 eggs with 2 tablespoons applesauce + 1 teaspoon baking powder for binding. For extra richness, add 1 tablespoon melted butter to the dough. The texture will be slightly different but still delicious. These work well for vegan diets when using flax eggs (1 tbsp ground flax + 3 tbsp water per egg).
How do I store these cookies to keep them soft?
Store in an airtight container at room temperature for up to 5 days. For longer storage, freeze dough balls (up to 3 months) or baked cookies (up to 2 months). To revive stale cookies, warm them in the oven at 300°F for 2-3 minutes with a pat of butter on top. Pro tip: Place a slice of bread in the container to absorb moisture and maintain freshness.
What's the secret to getting that perfect chewy center?
The magic happens with 3 key steps:
- Using equal parts brown and white sugar (brown sugar adds moisture),
- Chilling the dough for at least 1 hour (prevents spreading), and
- Baking until edges are golden but centers look slightly underdone (12-14 minutes at 350°F). The residual heat after baking finishes cooking the centers while you cool them on the sheet.
Can I use chocolate chunks instead of chips?
For a more professional look, use 1 cup chopped chocolate bar (70% dark or semisweet) plus 1 cup chocolate chips. Chop the chocolate into ½-inch pieces for better melting. The chunks add extra richness and a rustic appearance. If you're short on time, microwave the chopped chocolate for 20 seconds to soften before mixing into dough.